How to collaborate using a Gaia user account - Gaia Users
Help supportShould you have any question, please check the Gaia FAQ section or contact the Gaia Helpdesk |
Create or update your Gaia user account
You can register for a Gaia user account here.
If you wish to update your existing Gaia user account, you can do so through the top right corner. Click on your name and then select "My account". You can, for example, make an update to your email address. The email address is used when you wish to reset your password.
Upload a user table
Author: Héctor Cánovas, Jos de Bruijne, Deborah Baines, and Carlos Rios
The Gaia Archive offers the possibility to store data tables to registered users (follow this link to open an account in the Archive). This can be accomplished by means of two different mechanisms:
-
Table upload from local machine (by clicking over the "upload user table" buttom that is encompassed by a red circle in Fig. 1).
- Table upload from job result (by clicking over the "Create user table from results" button that is encompassed by a red square in Fig. 1).
Registered users are allocated 1 GB of disc space to store data tables (see this FAQ). Their available space is revealed when clicking on top of the user name as indicated by the red arrow in Fig. 1. The colour of the green button next to the user name turns into red when the free space decreases. The two mechanisms listed above are detailed below.
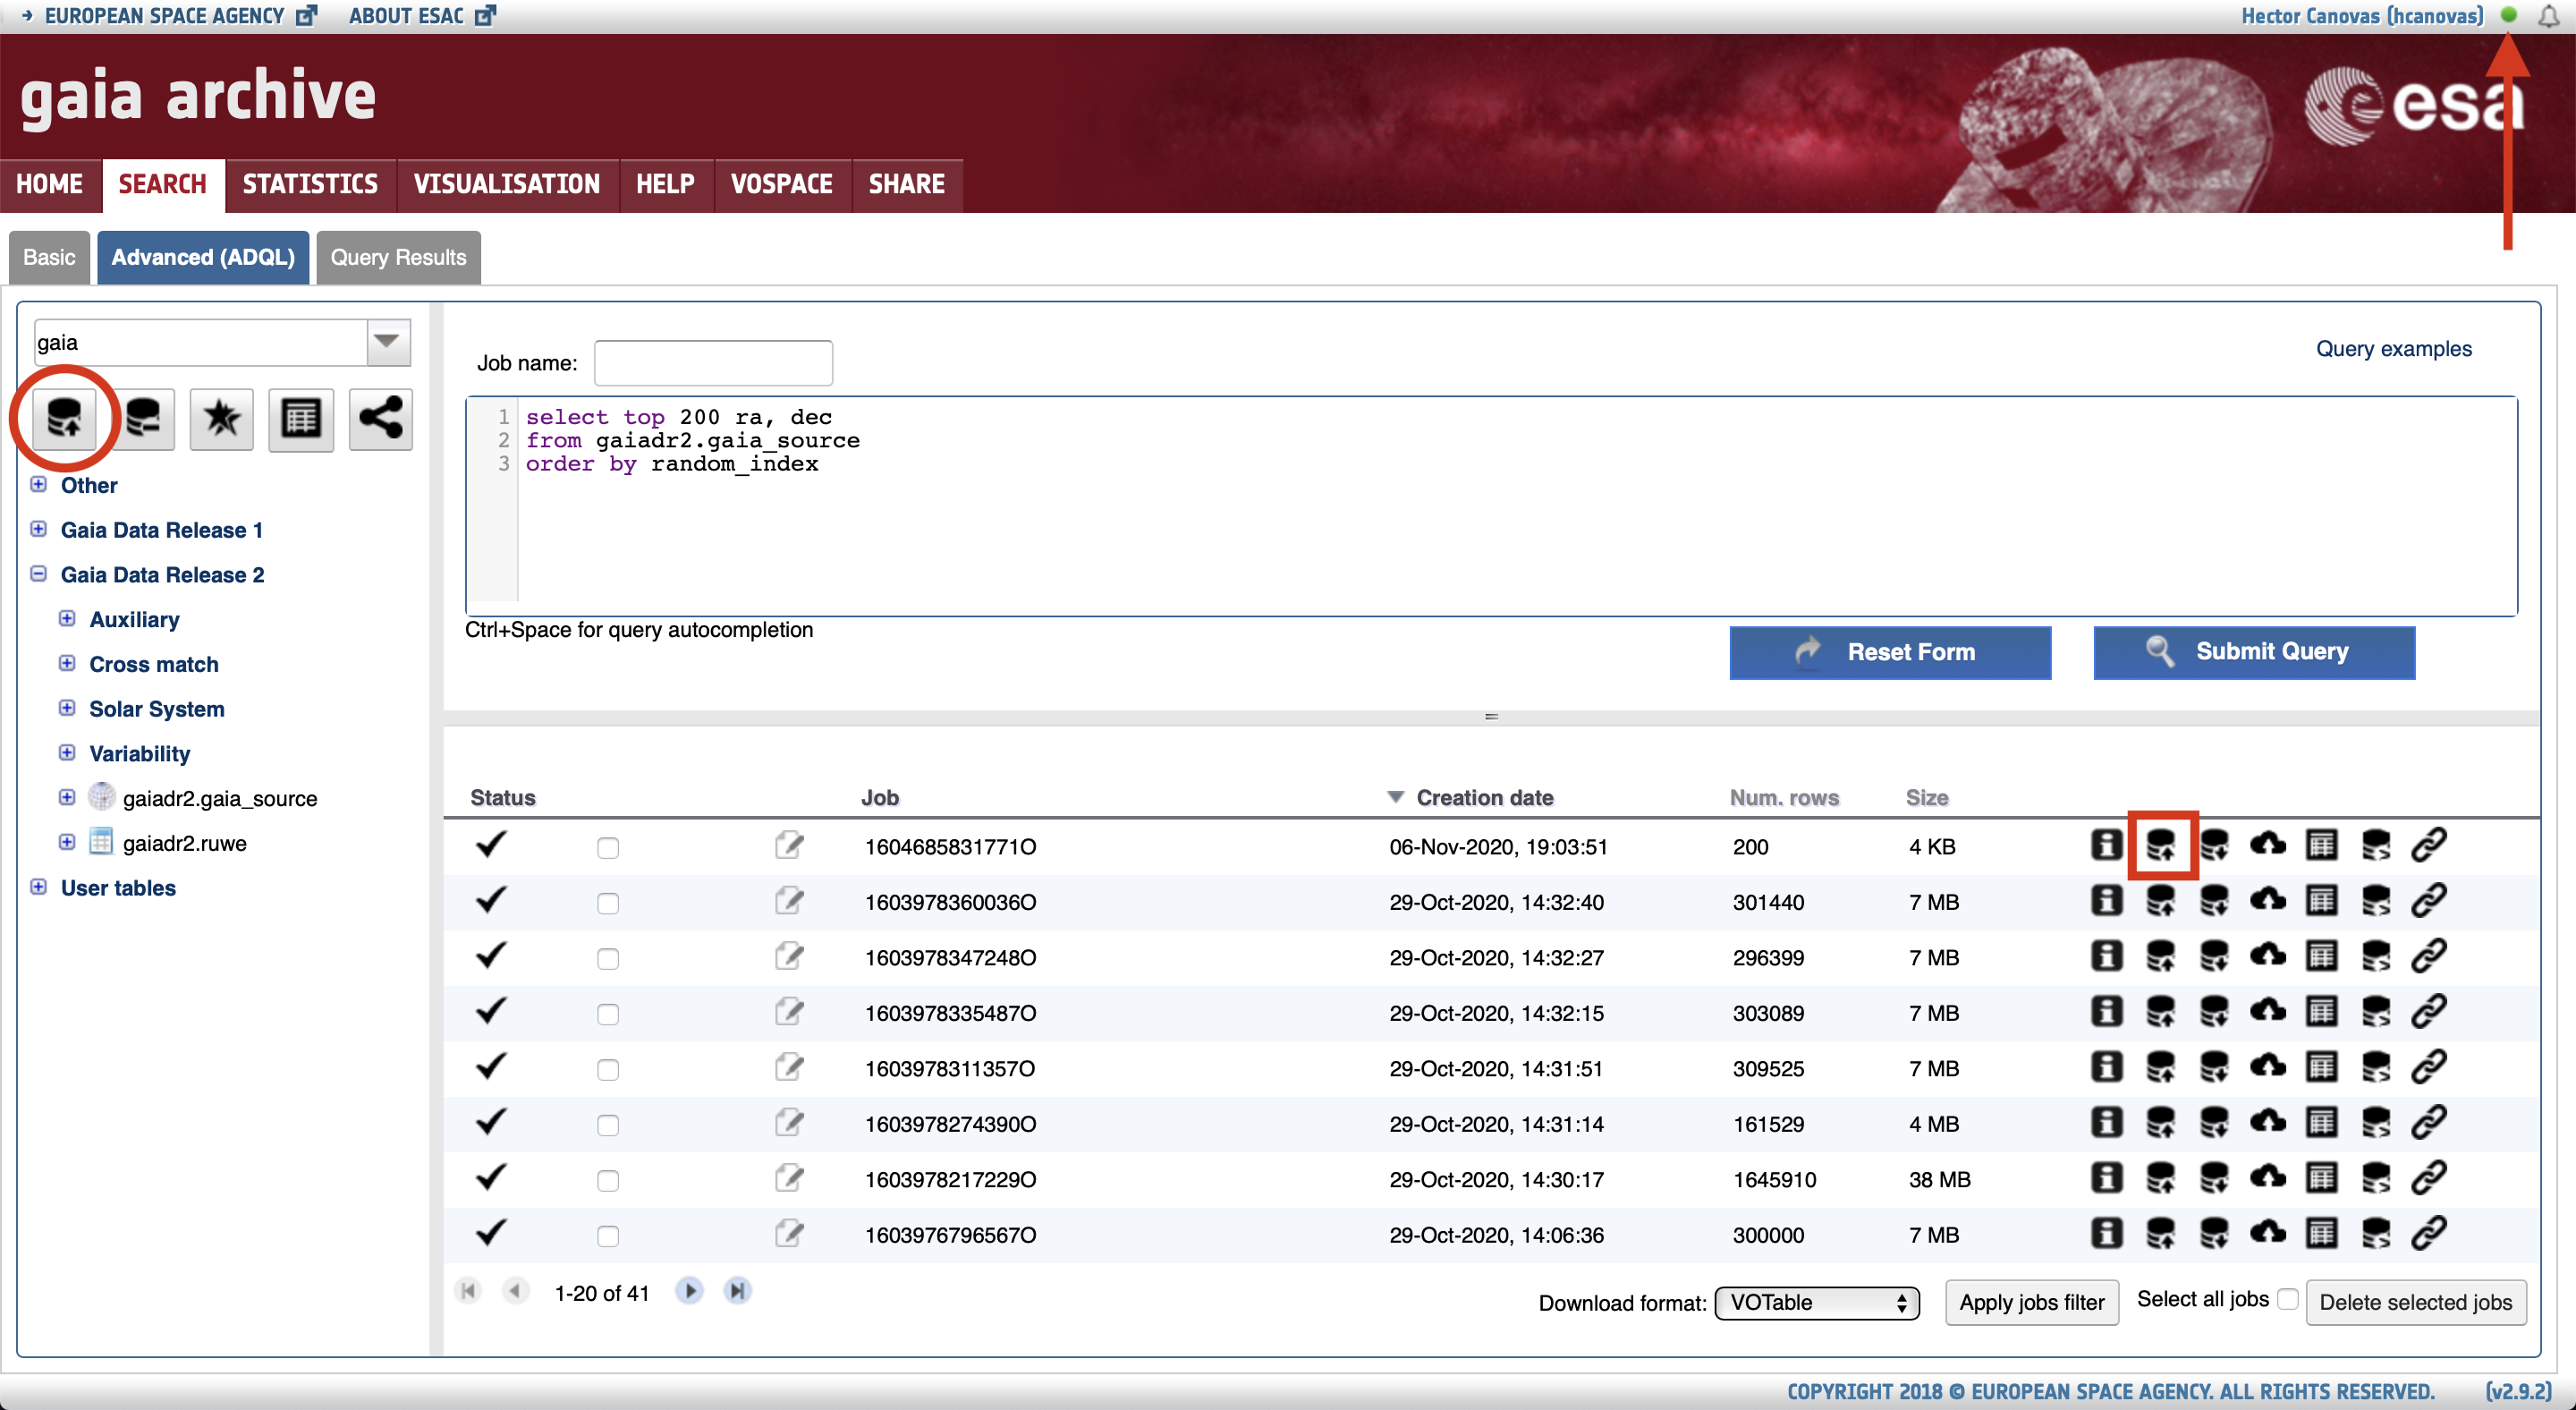
Figure 1: Screenshot showing the content of the Advanced (ADQL) tab of the GUI. The "upload user table" and "Create user table from results" buttons are highlighted by a red circle and square, respectively.
Table upload from local machine
A table can be uploaded to the user space by clicking with the cursor on the "upload user table" button (see Fig. 1). Once this is done a pop-up window that allows to upload a table from a local machine will appear. From that window it is also possible to 1) set the name that the table will receive in the user space, 2) include a basic description of the table, and 3) specify the format of the uploaded file (see Fig. 2). Currently the following formats are accepted by the Gaia Archive:
- VOTable.
- Comma-separated values (CSV).
- Space- or tab- separated values (ACII).
Examples of the table files in these 3 different formats can be found in this zipped file. When uploading a table it should be noted that:
- The upper-case letters included in the column names will be transformed to lower-case letters following the IVOA recommendation for the ADQL syntax.
- The Archive will automatically name the table columns as "col1, col2, ..., coln" if the uploaded table has no header.
- The Archive automatically adds a new indexed column to the uploaded table. This column, named as "<table_name>_oid" is useful to perform ADQL queries on the uploaded table.
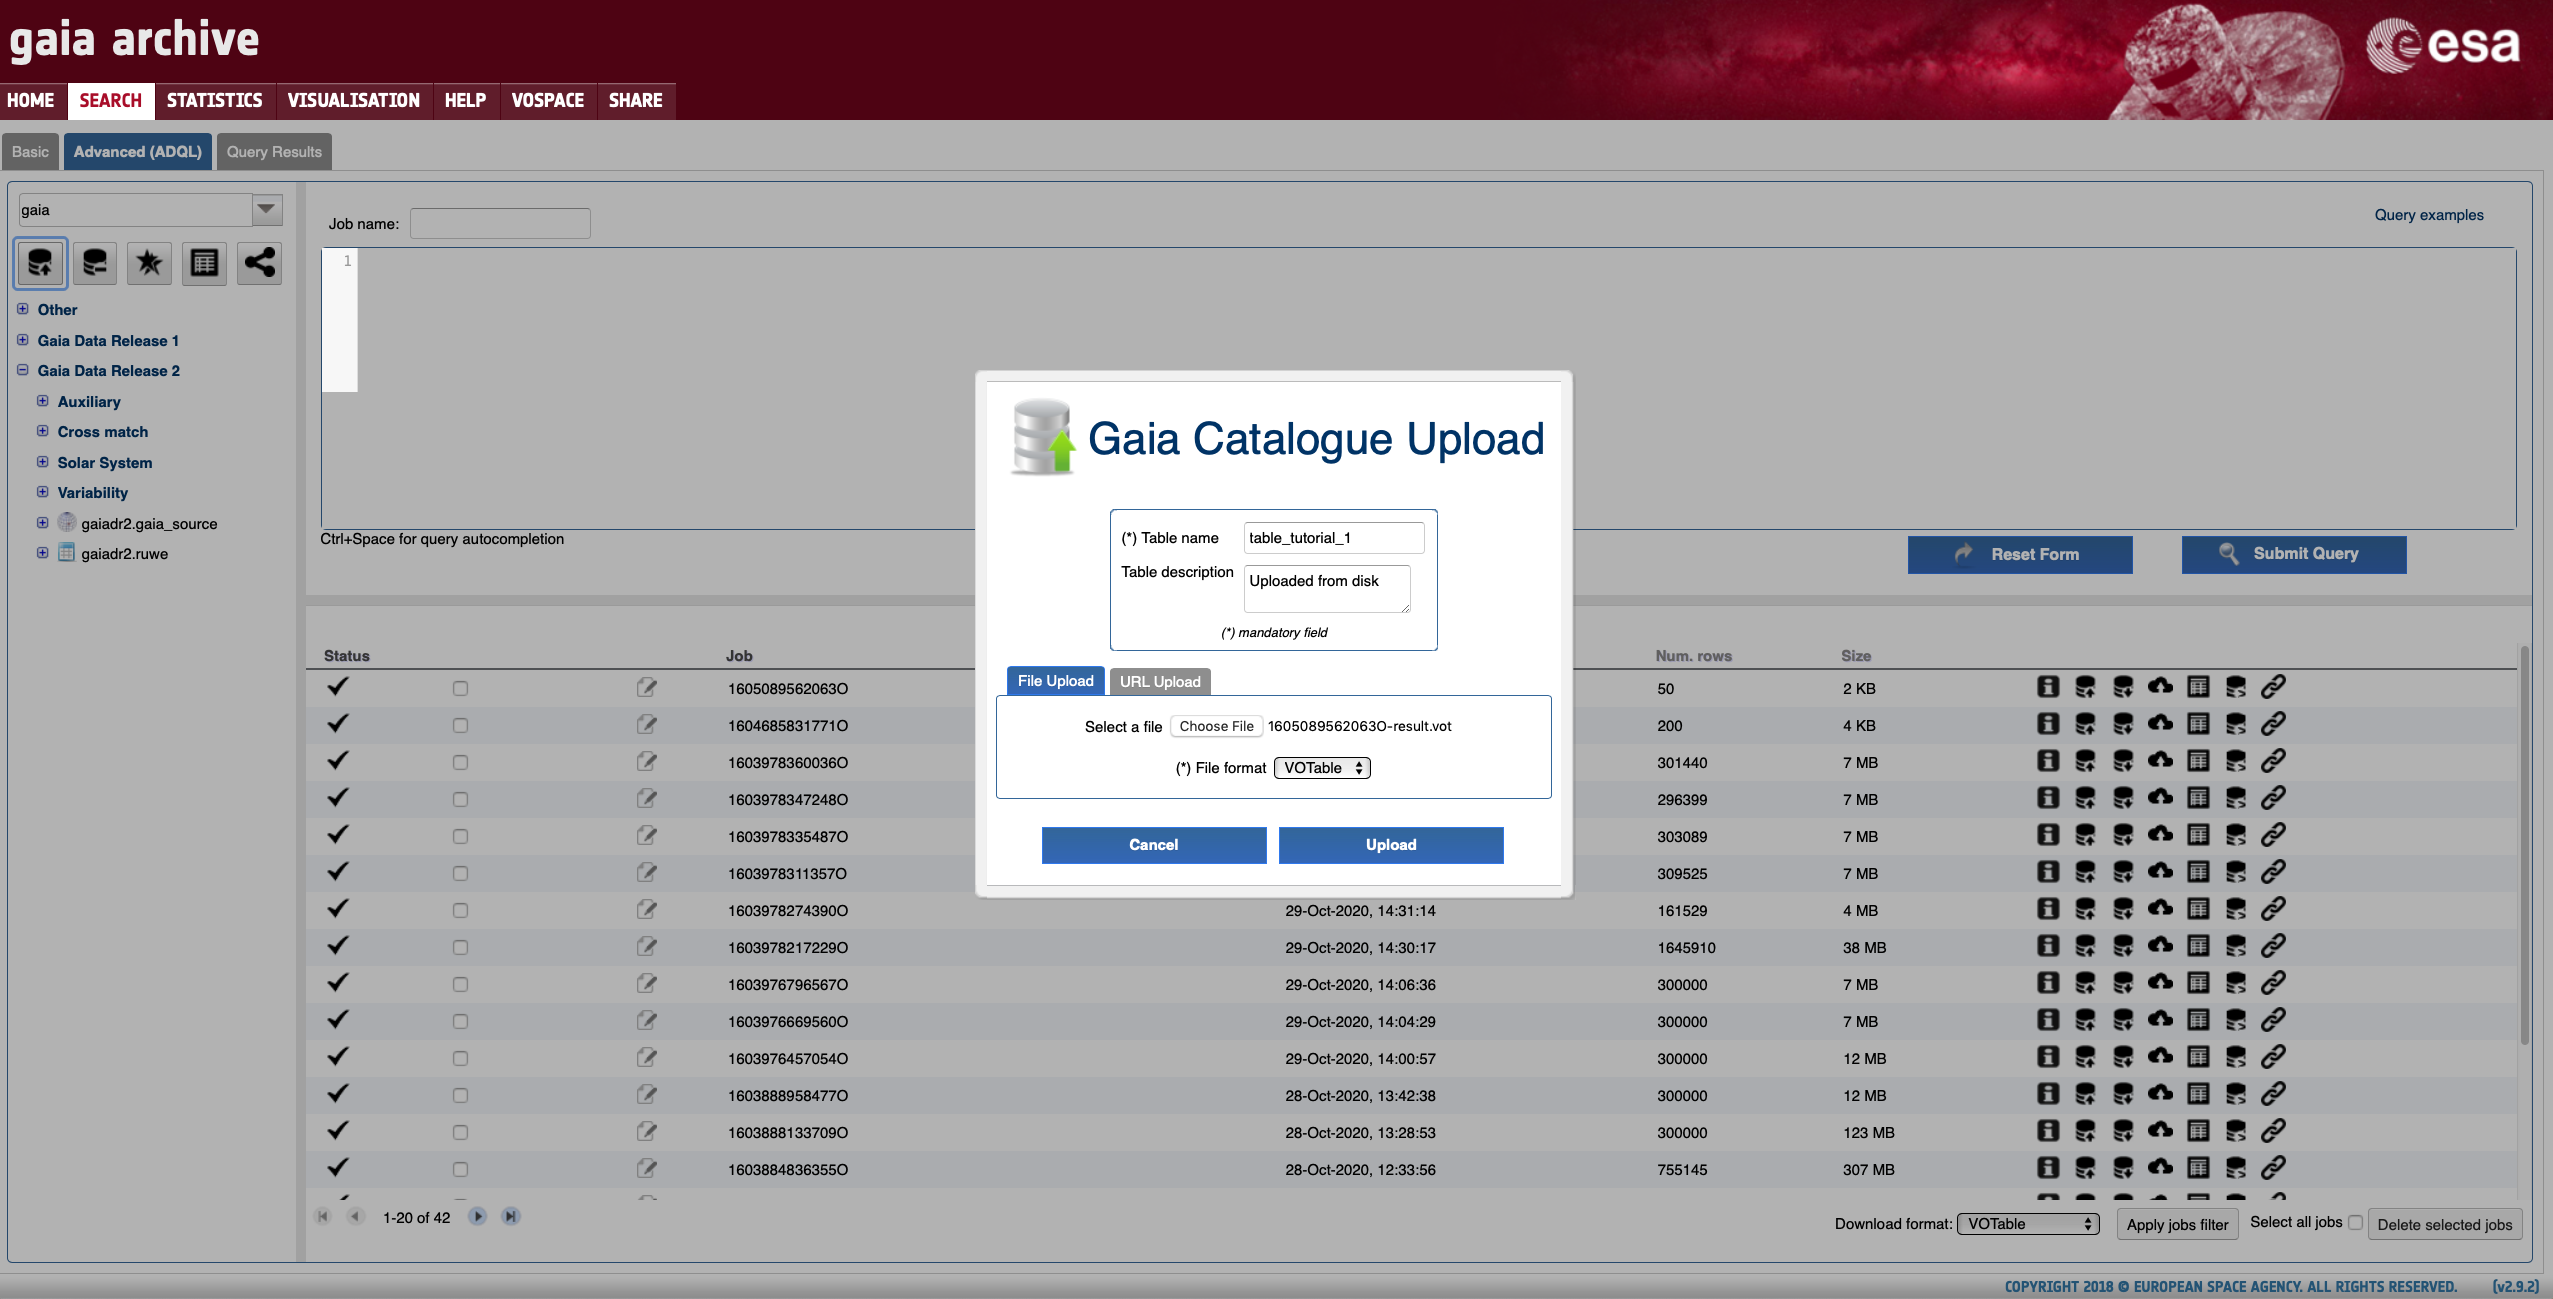
Figure 2: Screenshot showing the pop-up window that appears when clicking over the "upload user table" button (see Fig.1).
Once a table has been successfully uploaded it appears under the "User tables" schema, as illustrated by Fig. 3 below. The table uploaded in this tutorial contains 3 columns with the equatorial coordinates and 2MASS ID's of 20 sources extracted from the 2MASS point source catalogue, and it appears as "user_<user_name>.table_tutorial_1" as the Table name was set to "table_tutorial_1" when uploading it (see Fig. 2 above). The basic attributes of the table (name, description, and size) are shown in a yellow pop-up window that appears after clicking with the cursor on top of the table name. From the pop-up menu it is also possible to inspect the first 20 rows of the table.
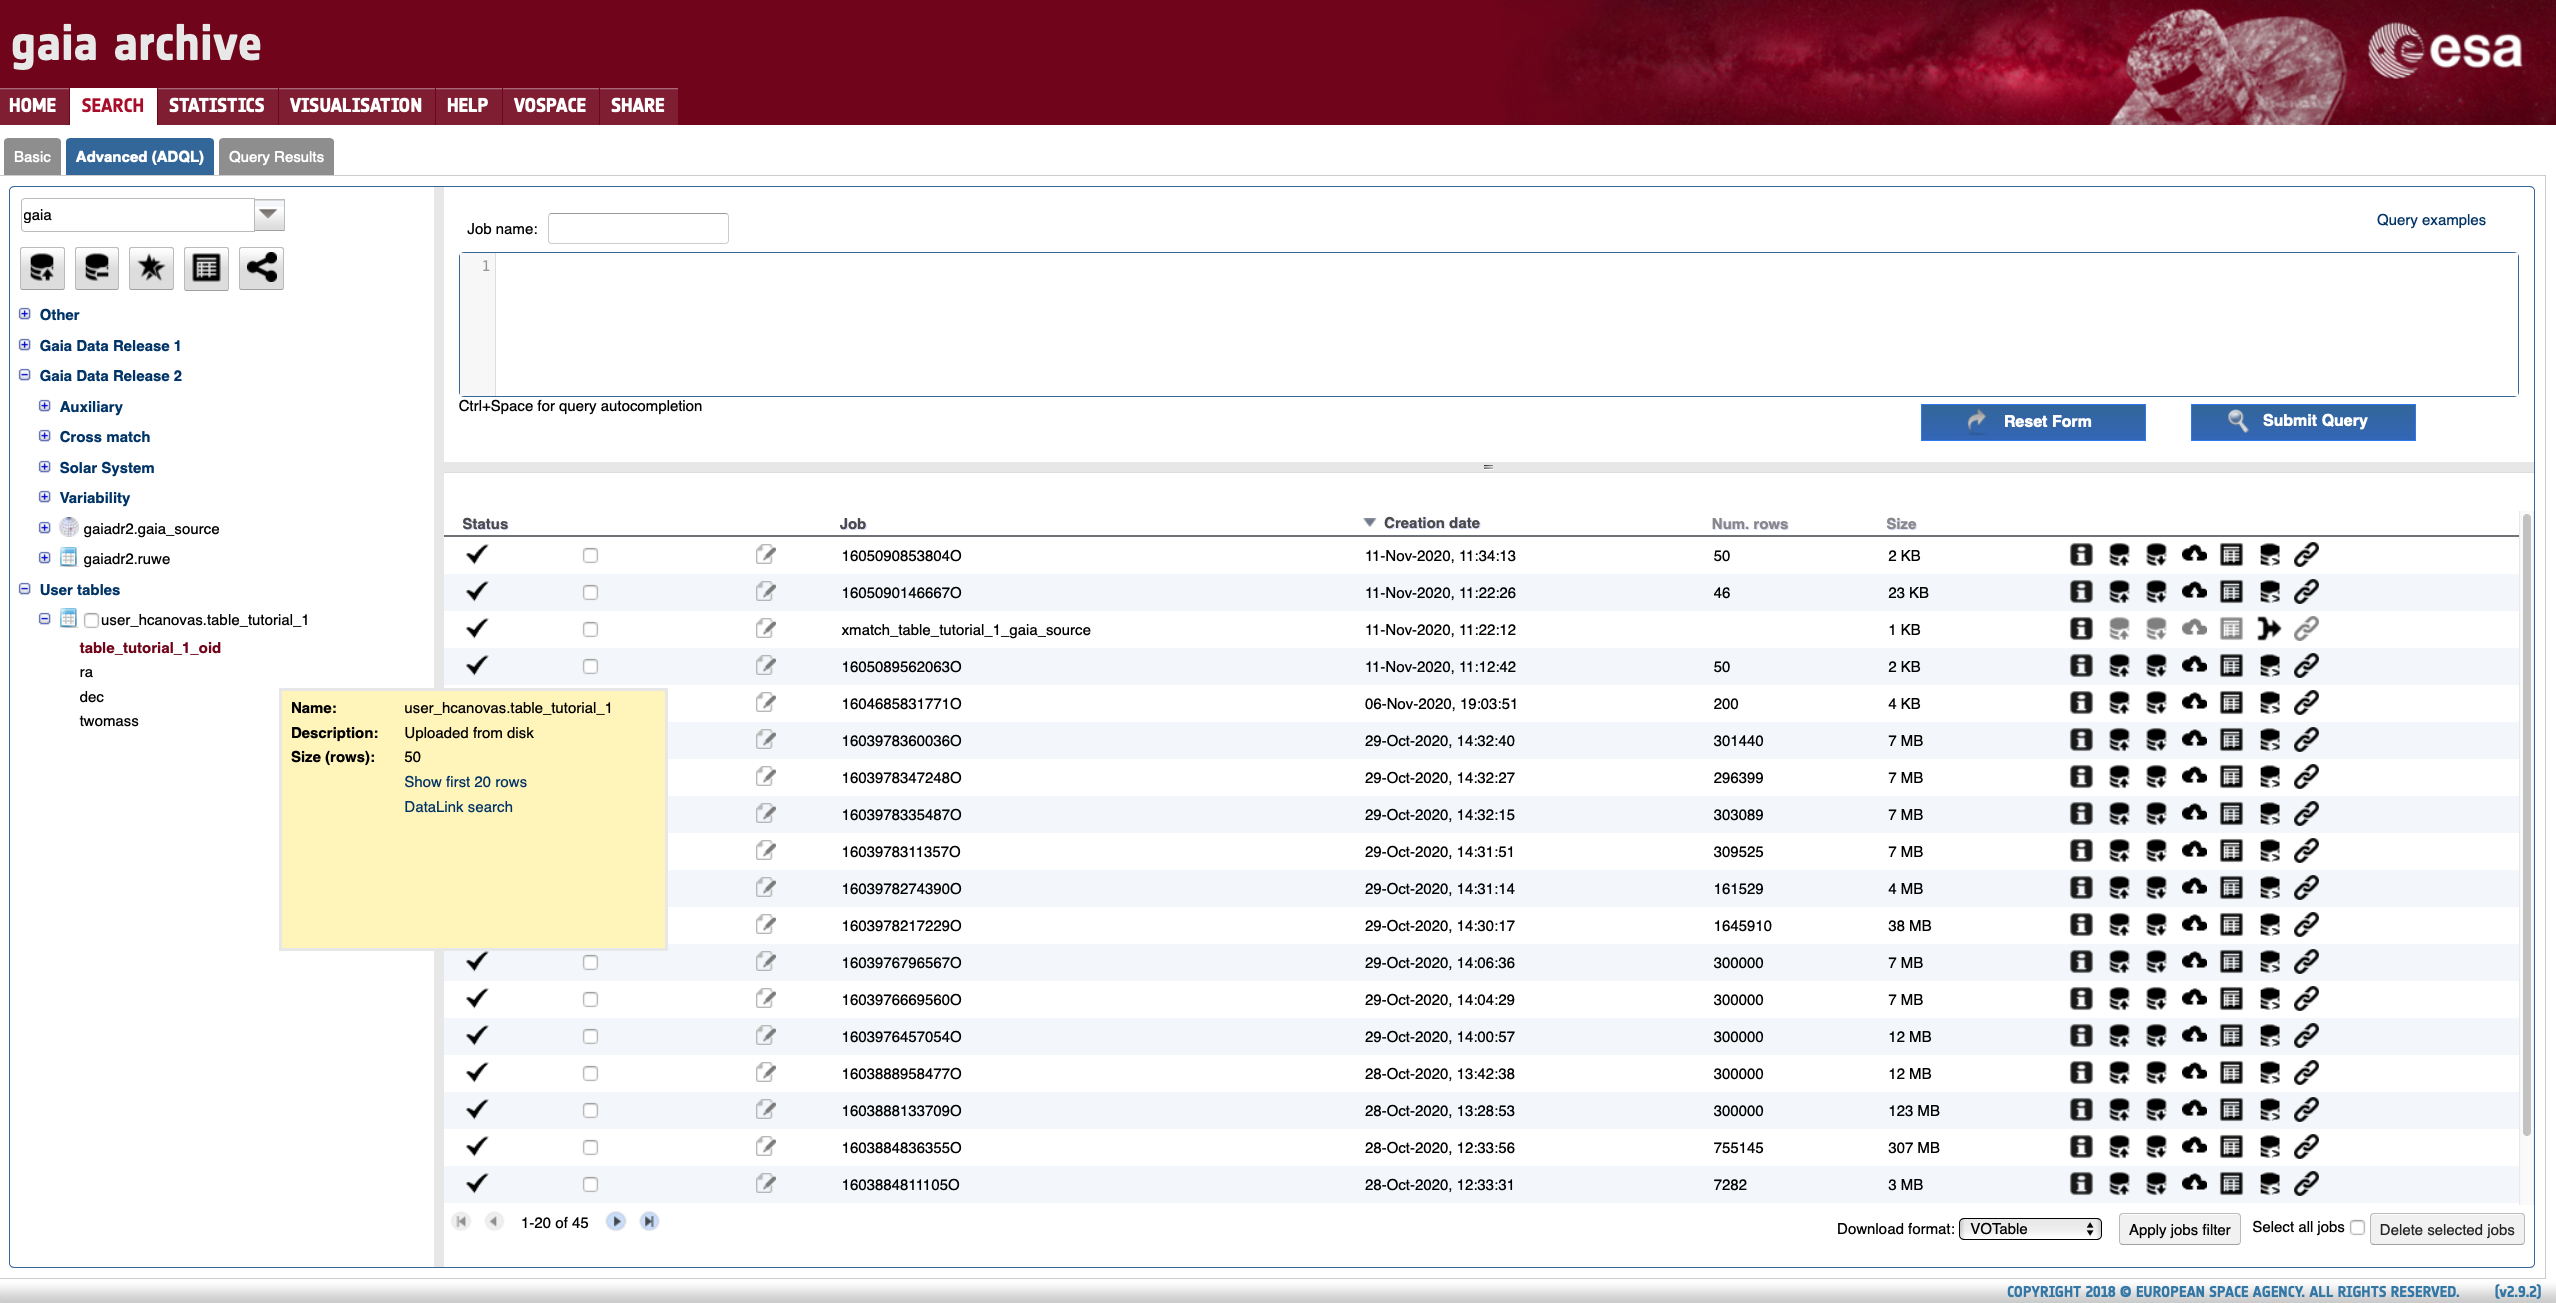
Figure 3: Screenshot showing the attributes of the table uploaded to the user space. The pop-up window appears after clicking over the name of the uploaded table.
The table metadata can be modified using the "edit table" button that is encompassed by the red circle in Fig. 4 below. This is specially useful to e.g. perform cross-matches using the built-in cross-match tool available in the Archive (for more information please take a look at this tutorial). In the example illustrated in Fig. 4 we are indicating that the "ra" and "dec" columns of the uploaded (marked with a tickmark in the tables tree) correspond to right ascension and declination. After doing this the icon shown on the left side of the table name changes from a table-like icon to a celestial sphere-like icon.
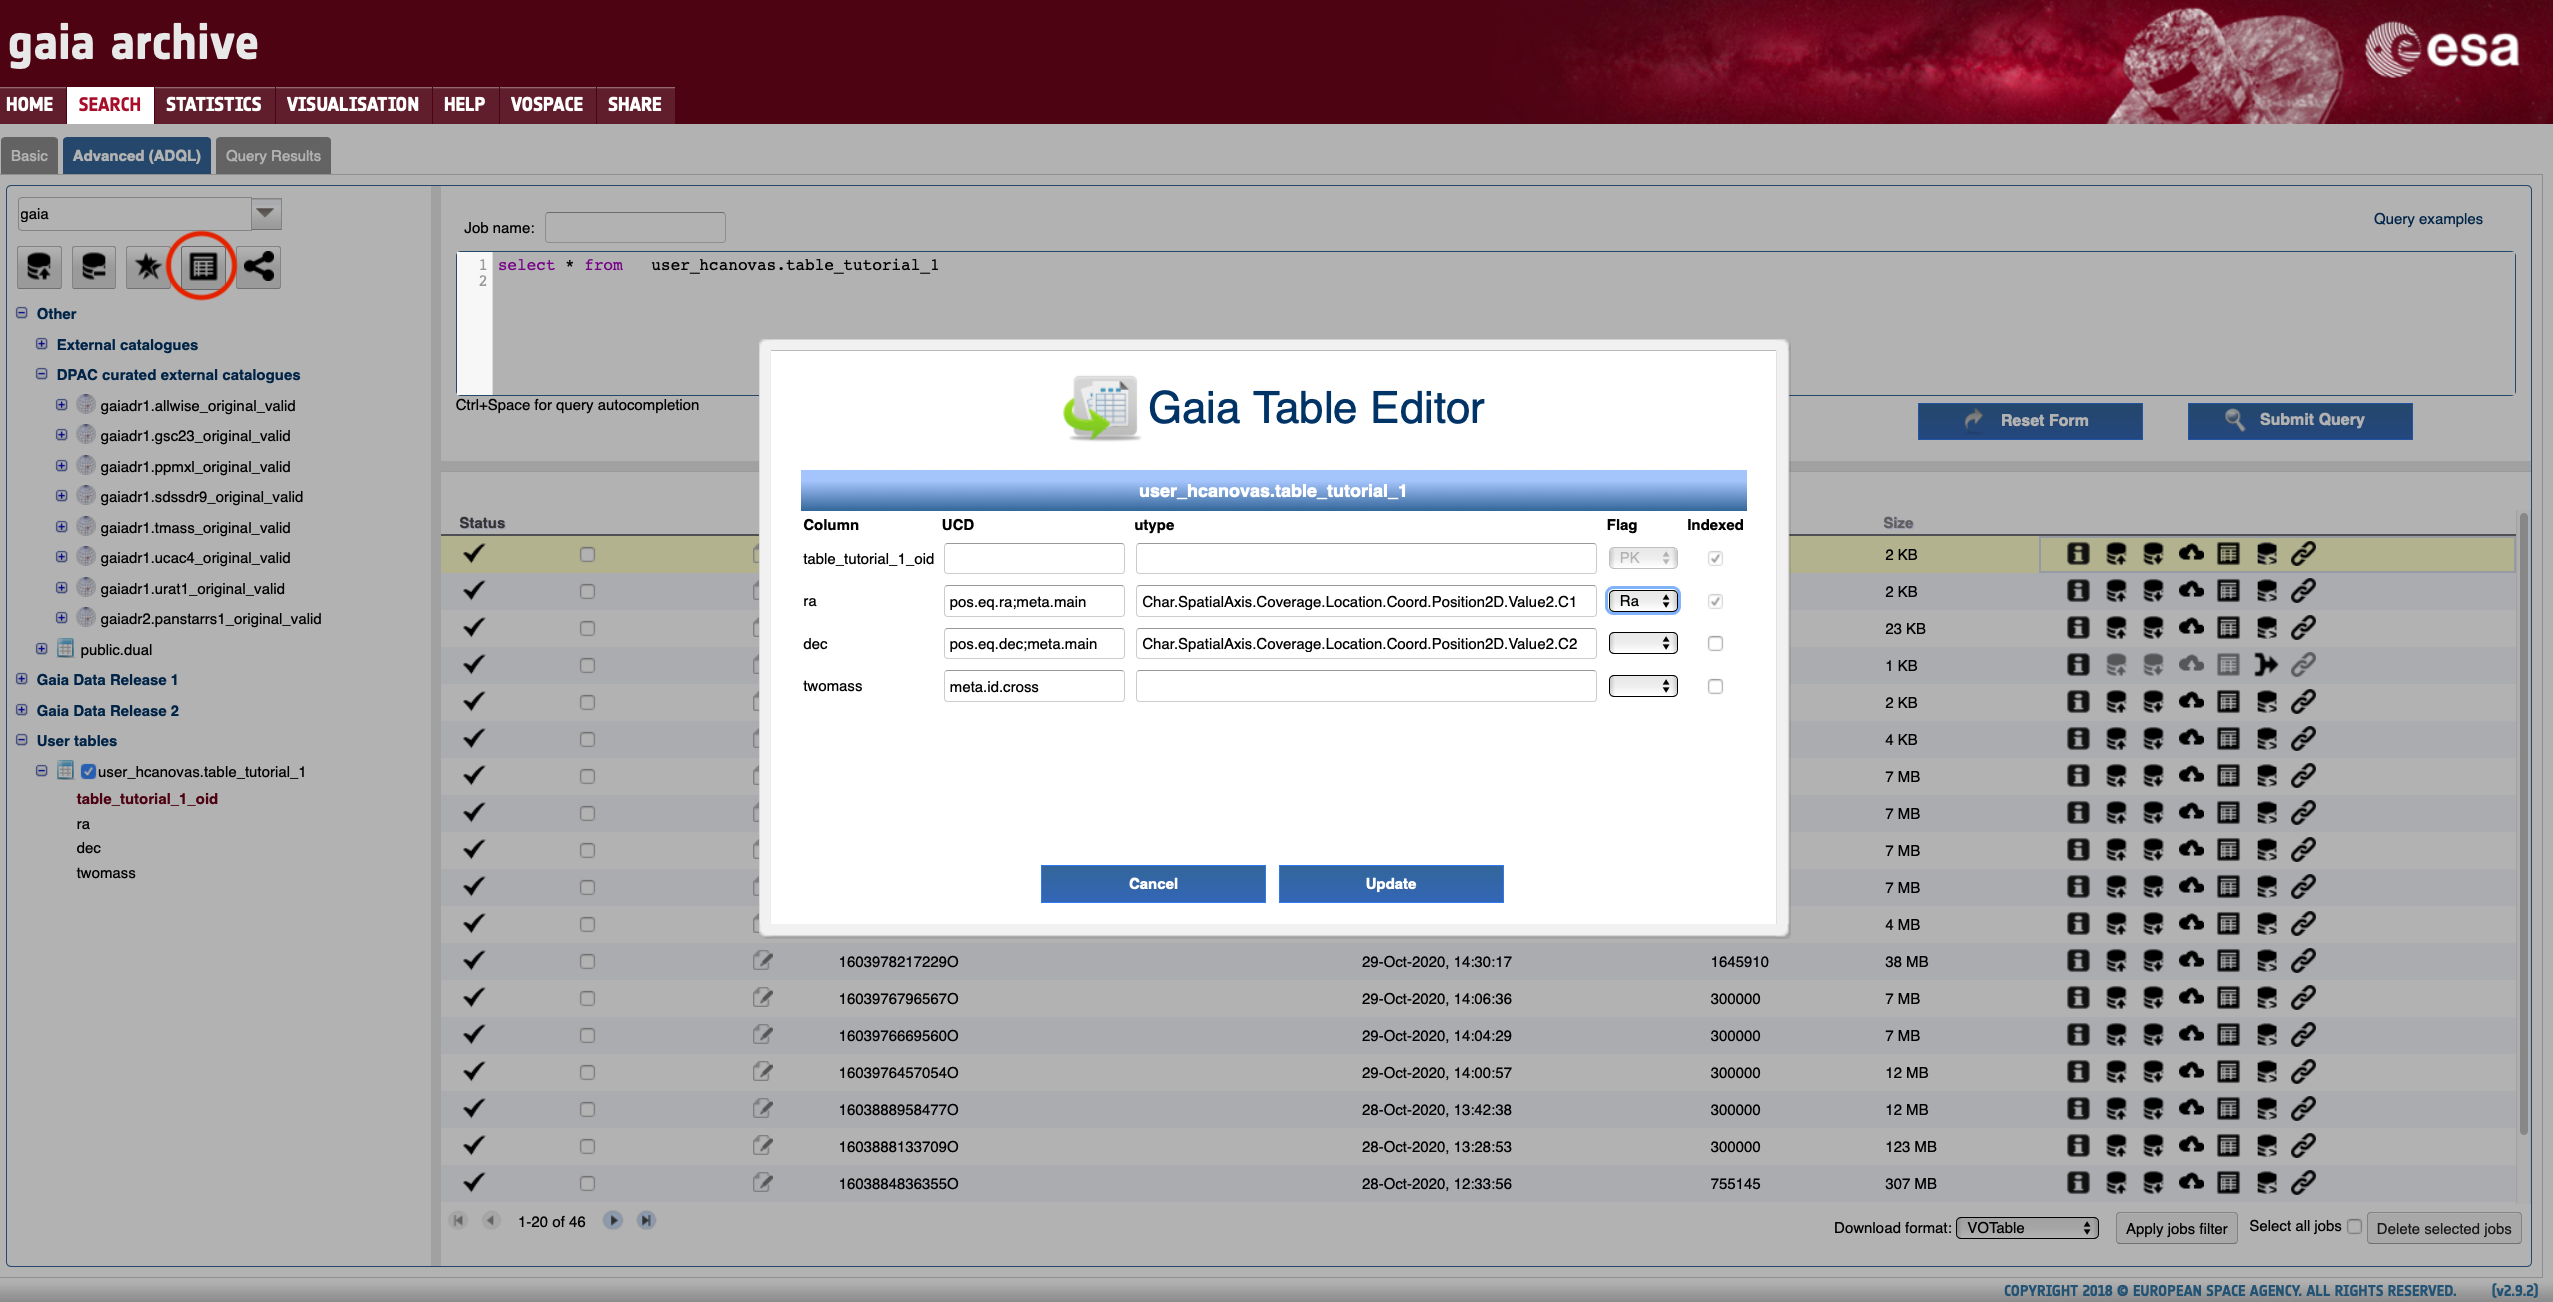
Figure 4: Screenshot showing how to modify the metadata of a table stored in the Archive user space.
table upload from Job result
The output of a successful ADQL query can be easily saved as a table in the user space by clicking on the "Create user table from results" as illustrated in Fig. 1. After doing so, a pop-up window that allows to set the table name and include a basic description of it will show up. Once the table is stored in the user space, its content can be inspected and its metadata can be modified as explained above.
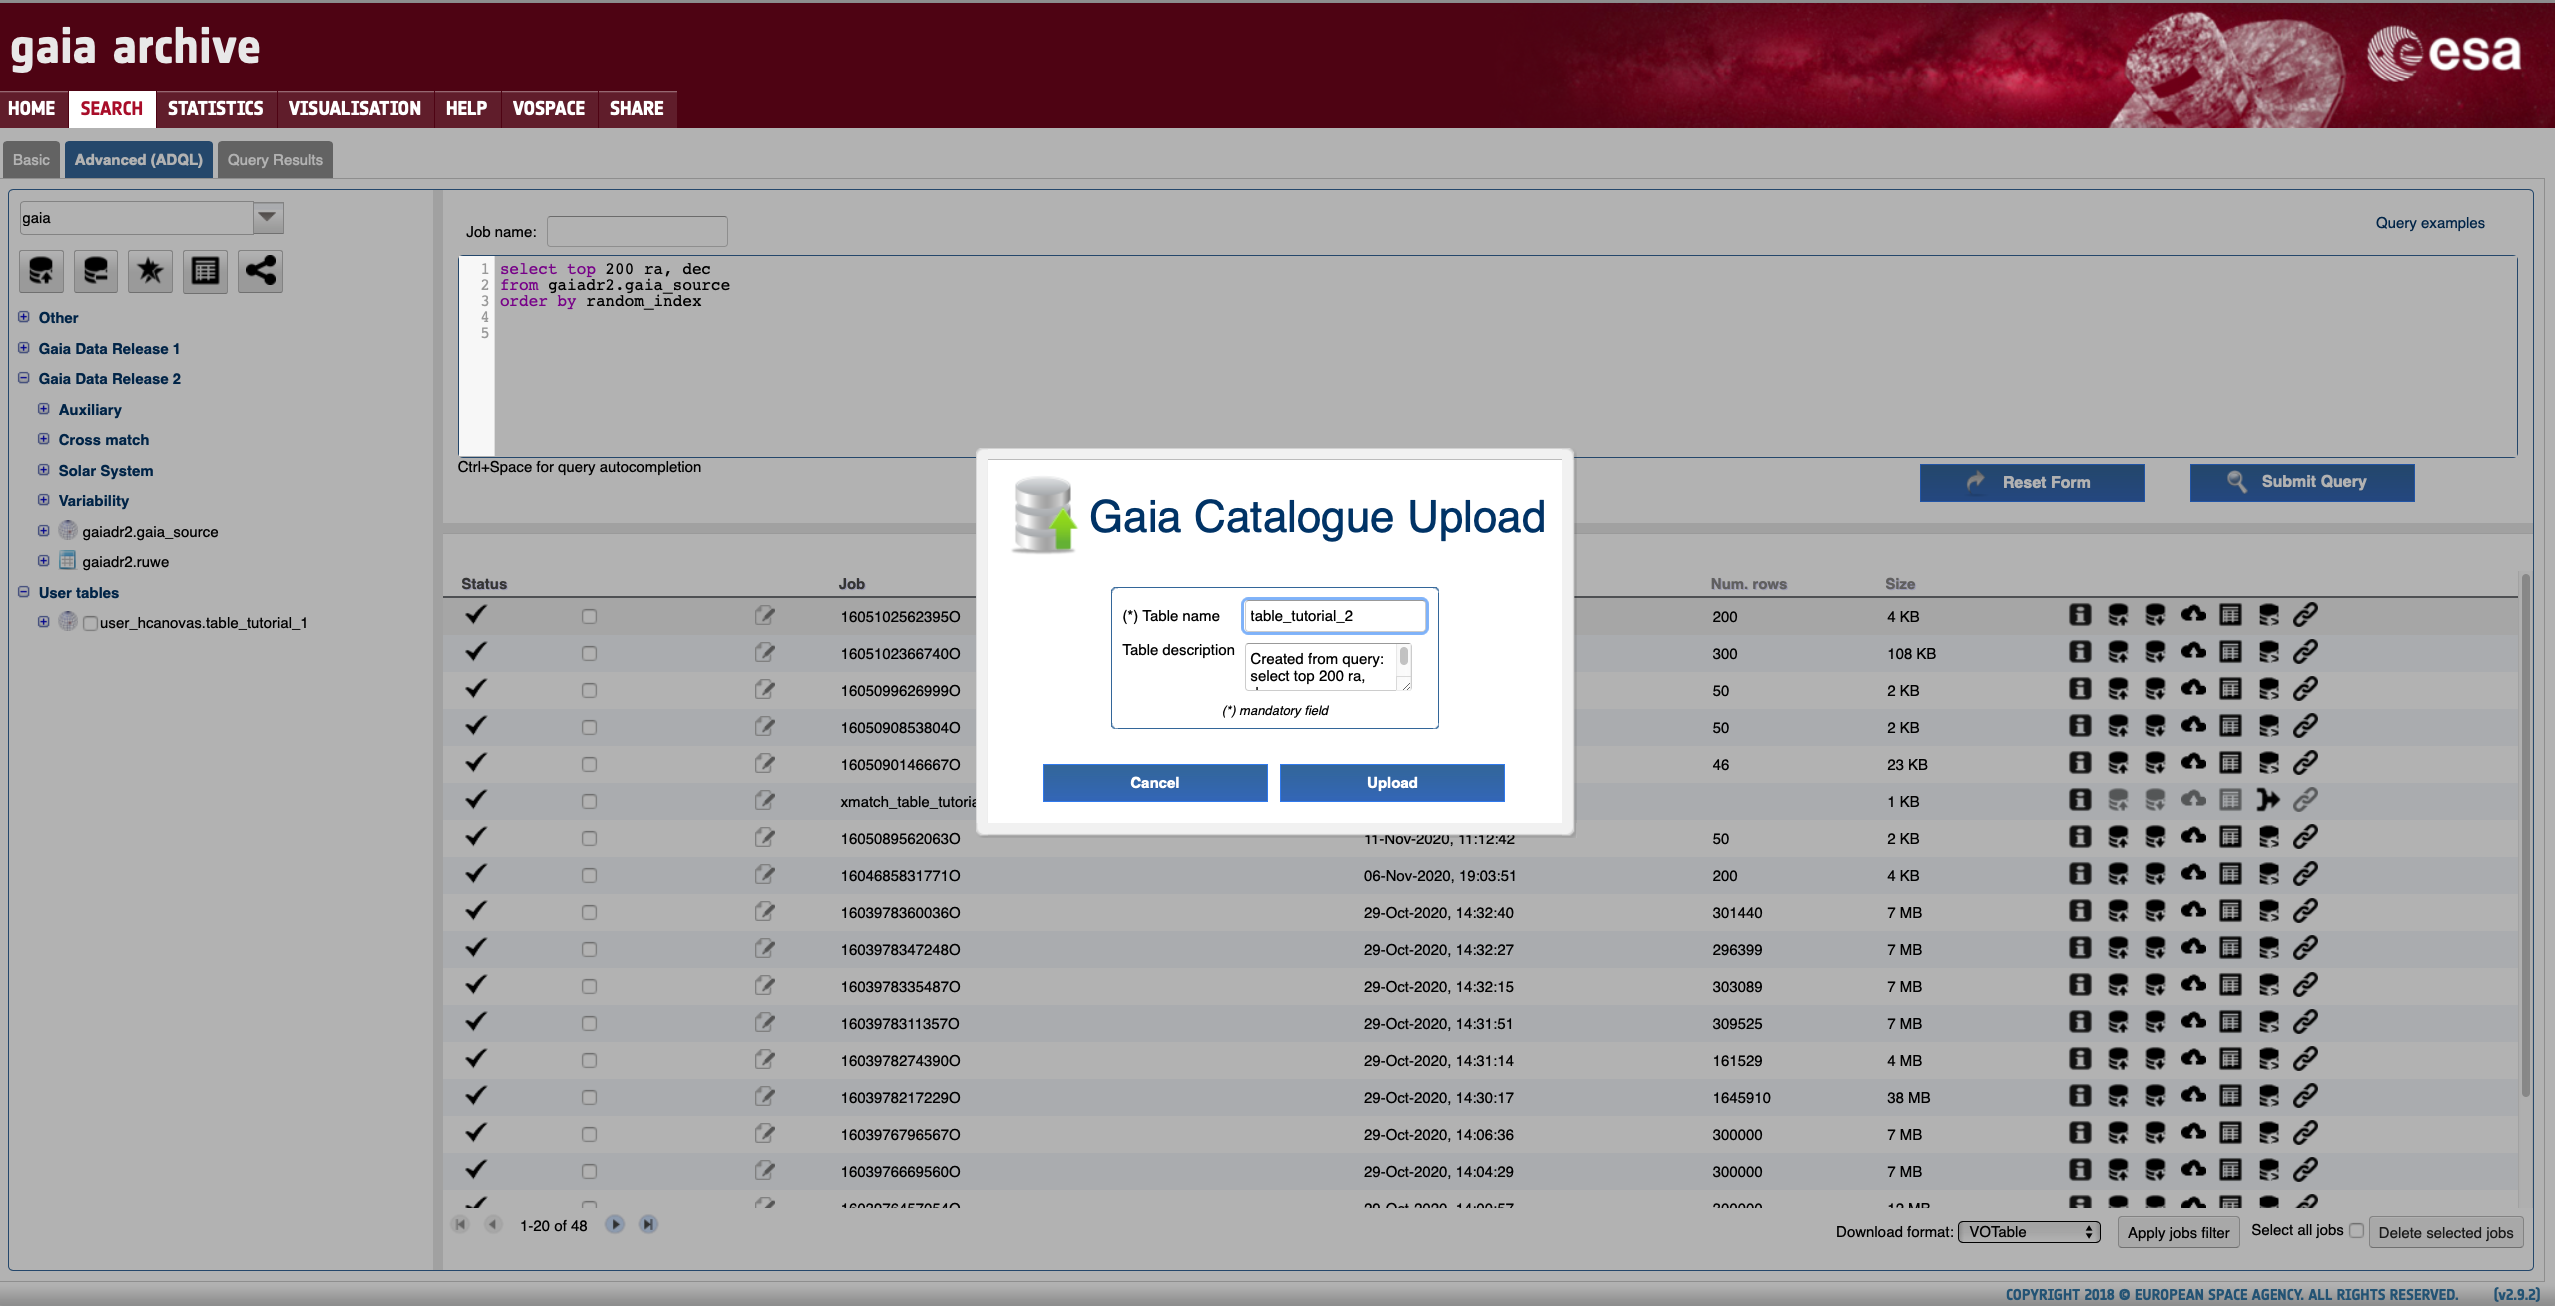
Figure 5: Screenshot showing the pop-up window which allows to name the uploaded table.
Share a user table
Author: Héctor Cánovas
The sharing functionality allows to share tables among registered users of the Archive. The first step to share a table consists in uploading it to the user space, as explained in the previous tutorial. Once the table has been uploaded it is possible to:
- share it with the users from an existing group, or
- create a new group of users and share it with them.
To proceed with the first option, go to the SHARE > Sharing items tab of the GUI. The "Resource to share" menu (indicated by the vertical arrow in Fig. 1) allows to select the table that is going to be shared from the list of tables that you have previously uploaded to your user space. A pop-up window will open after clicking on top of the "Share item" button. In this window you can update the description of the shared table and select the group that you are going to share the table with by means of the "Share item to group" menu (indicated by the horizontal arrow in Fig. 1).
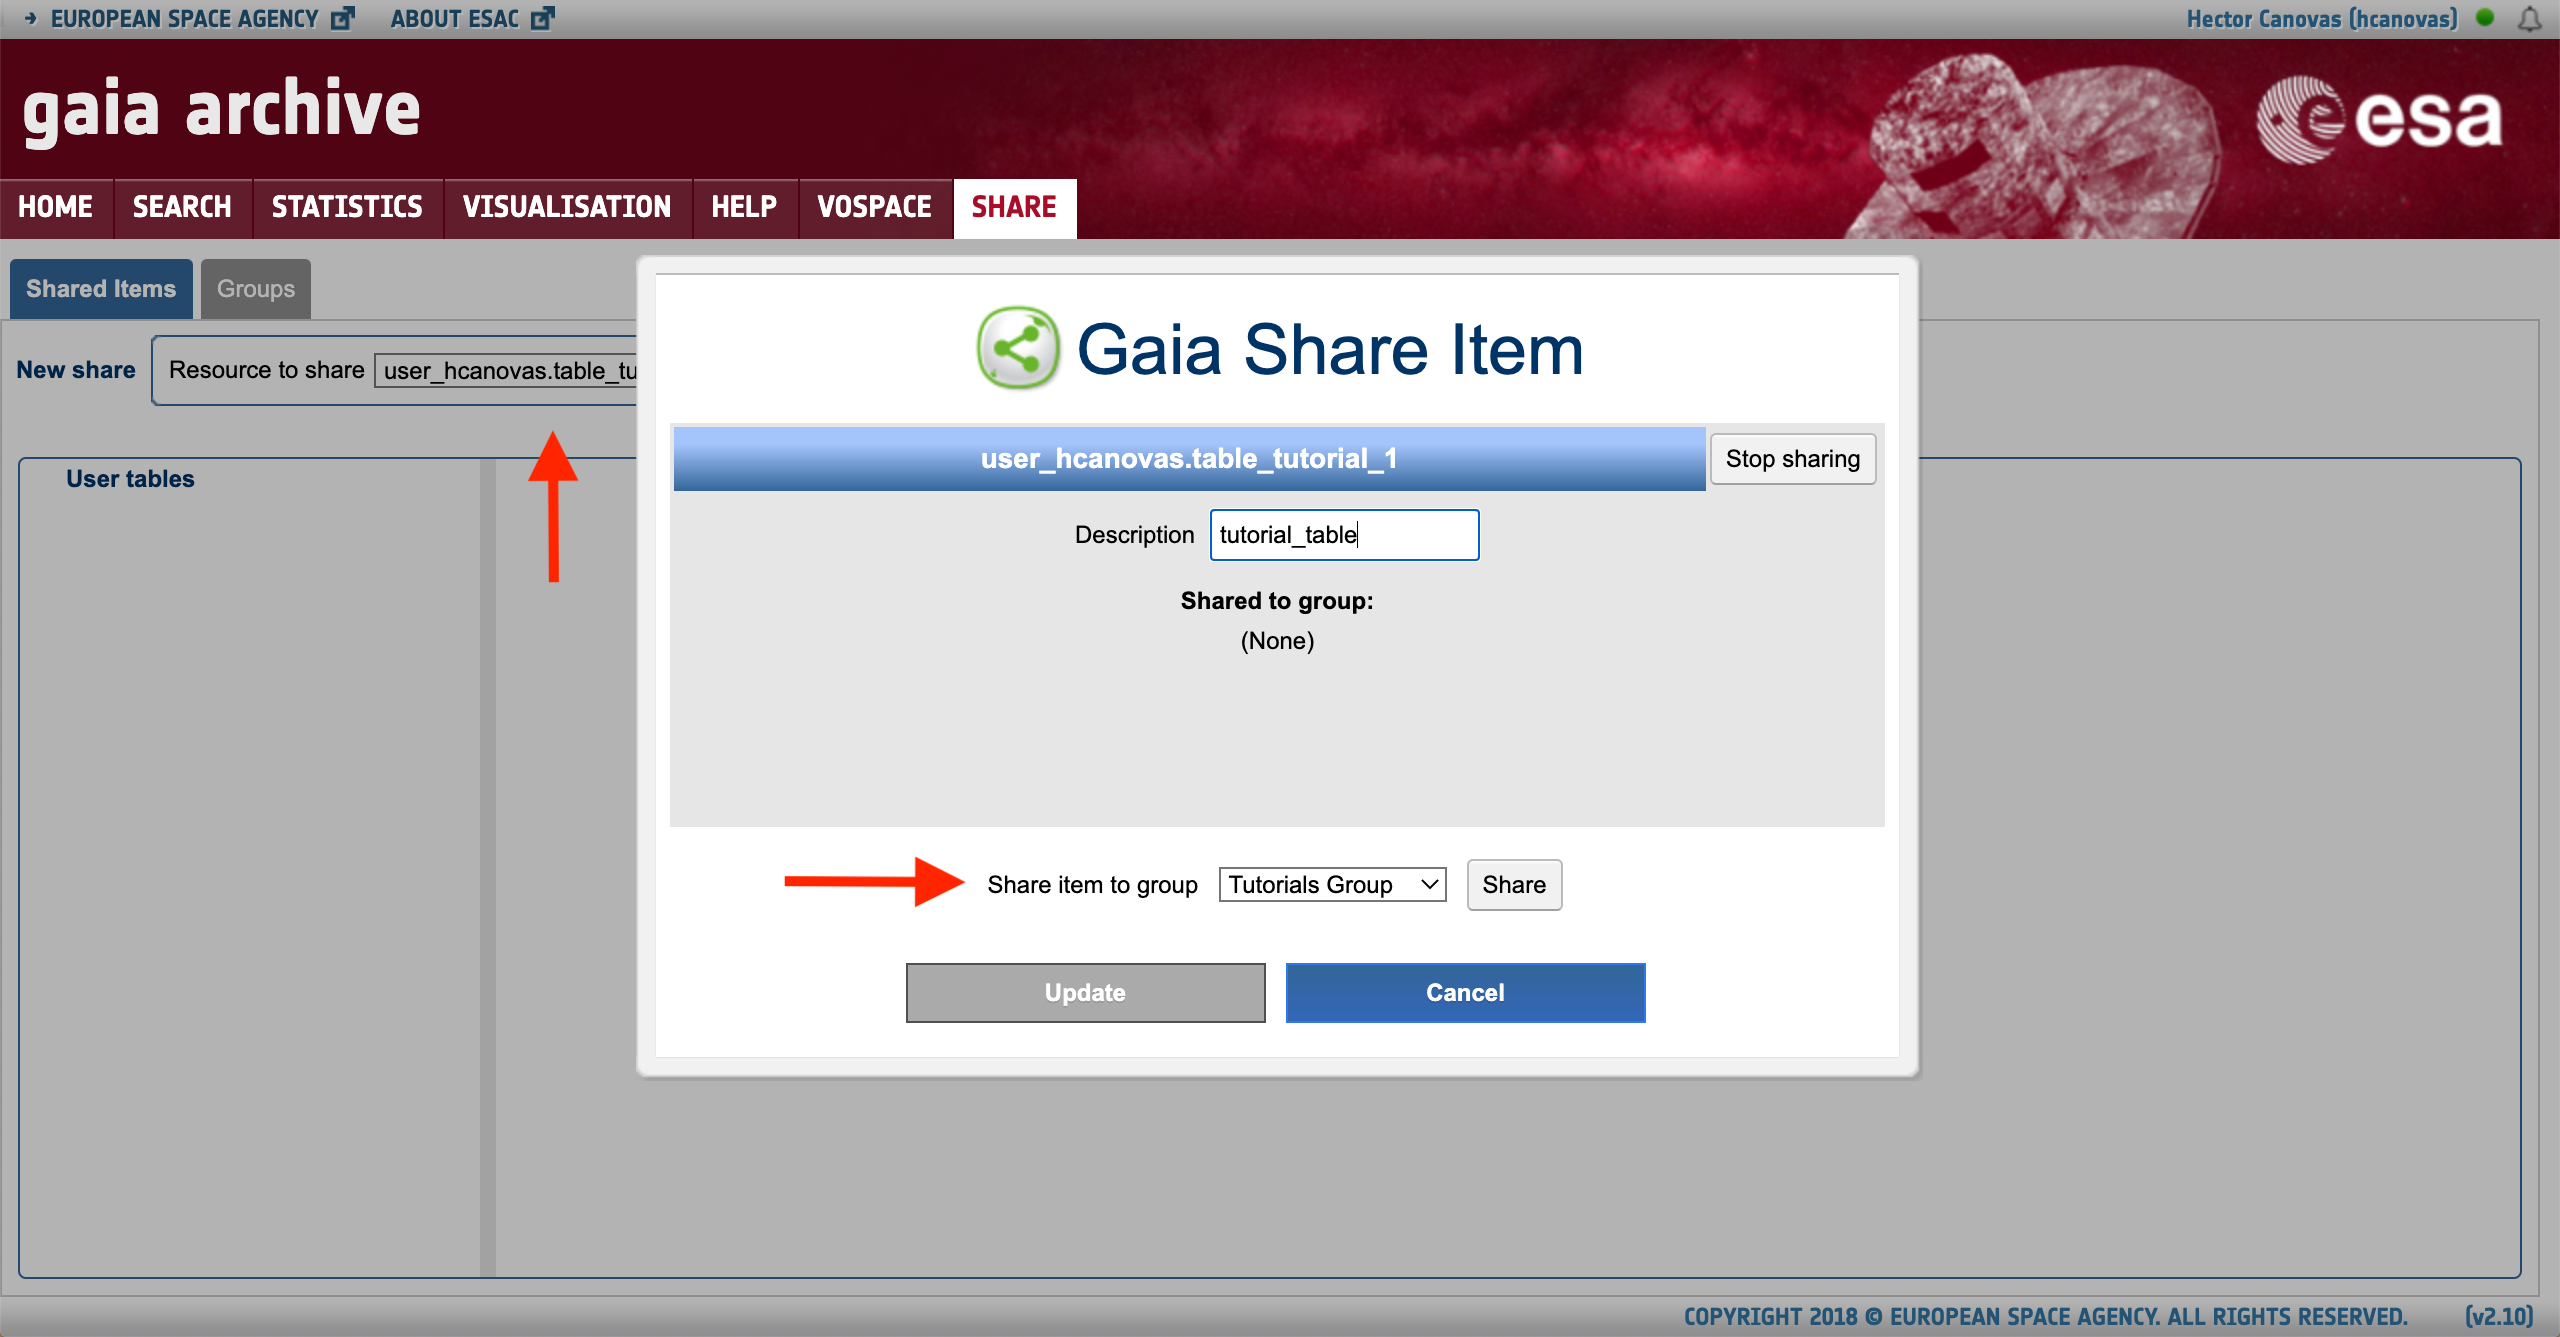
Figure 1: Content of the "Share Item" menu. The horizontal and vertical arrows indicate how to select a table for sharing and the group to share with, respectively.
To create a new group from scratch go to the SHARE > Groups tab of the GUI. Then use the "Identifier Title" and "Description" menus to set the title and description of the group that will be generated right after you click on the "Create" button (see Fig. 2). As soon as the group is created it will be listed under the "Groups" schema on the left side of the window. To edit its properties, simply click on top of its name and hit on the "Edit" button: a pop-up window with editing capabilities will show up. Once you have set the group members you can share a table with all of them by following the steps explained above.
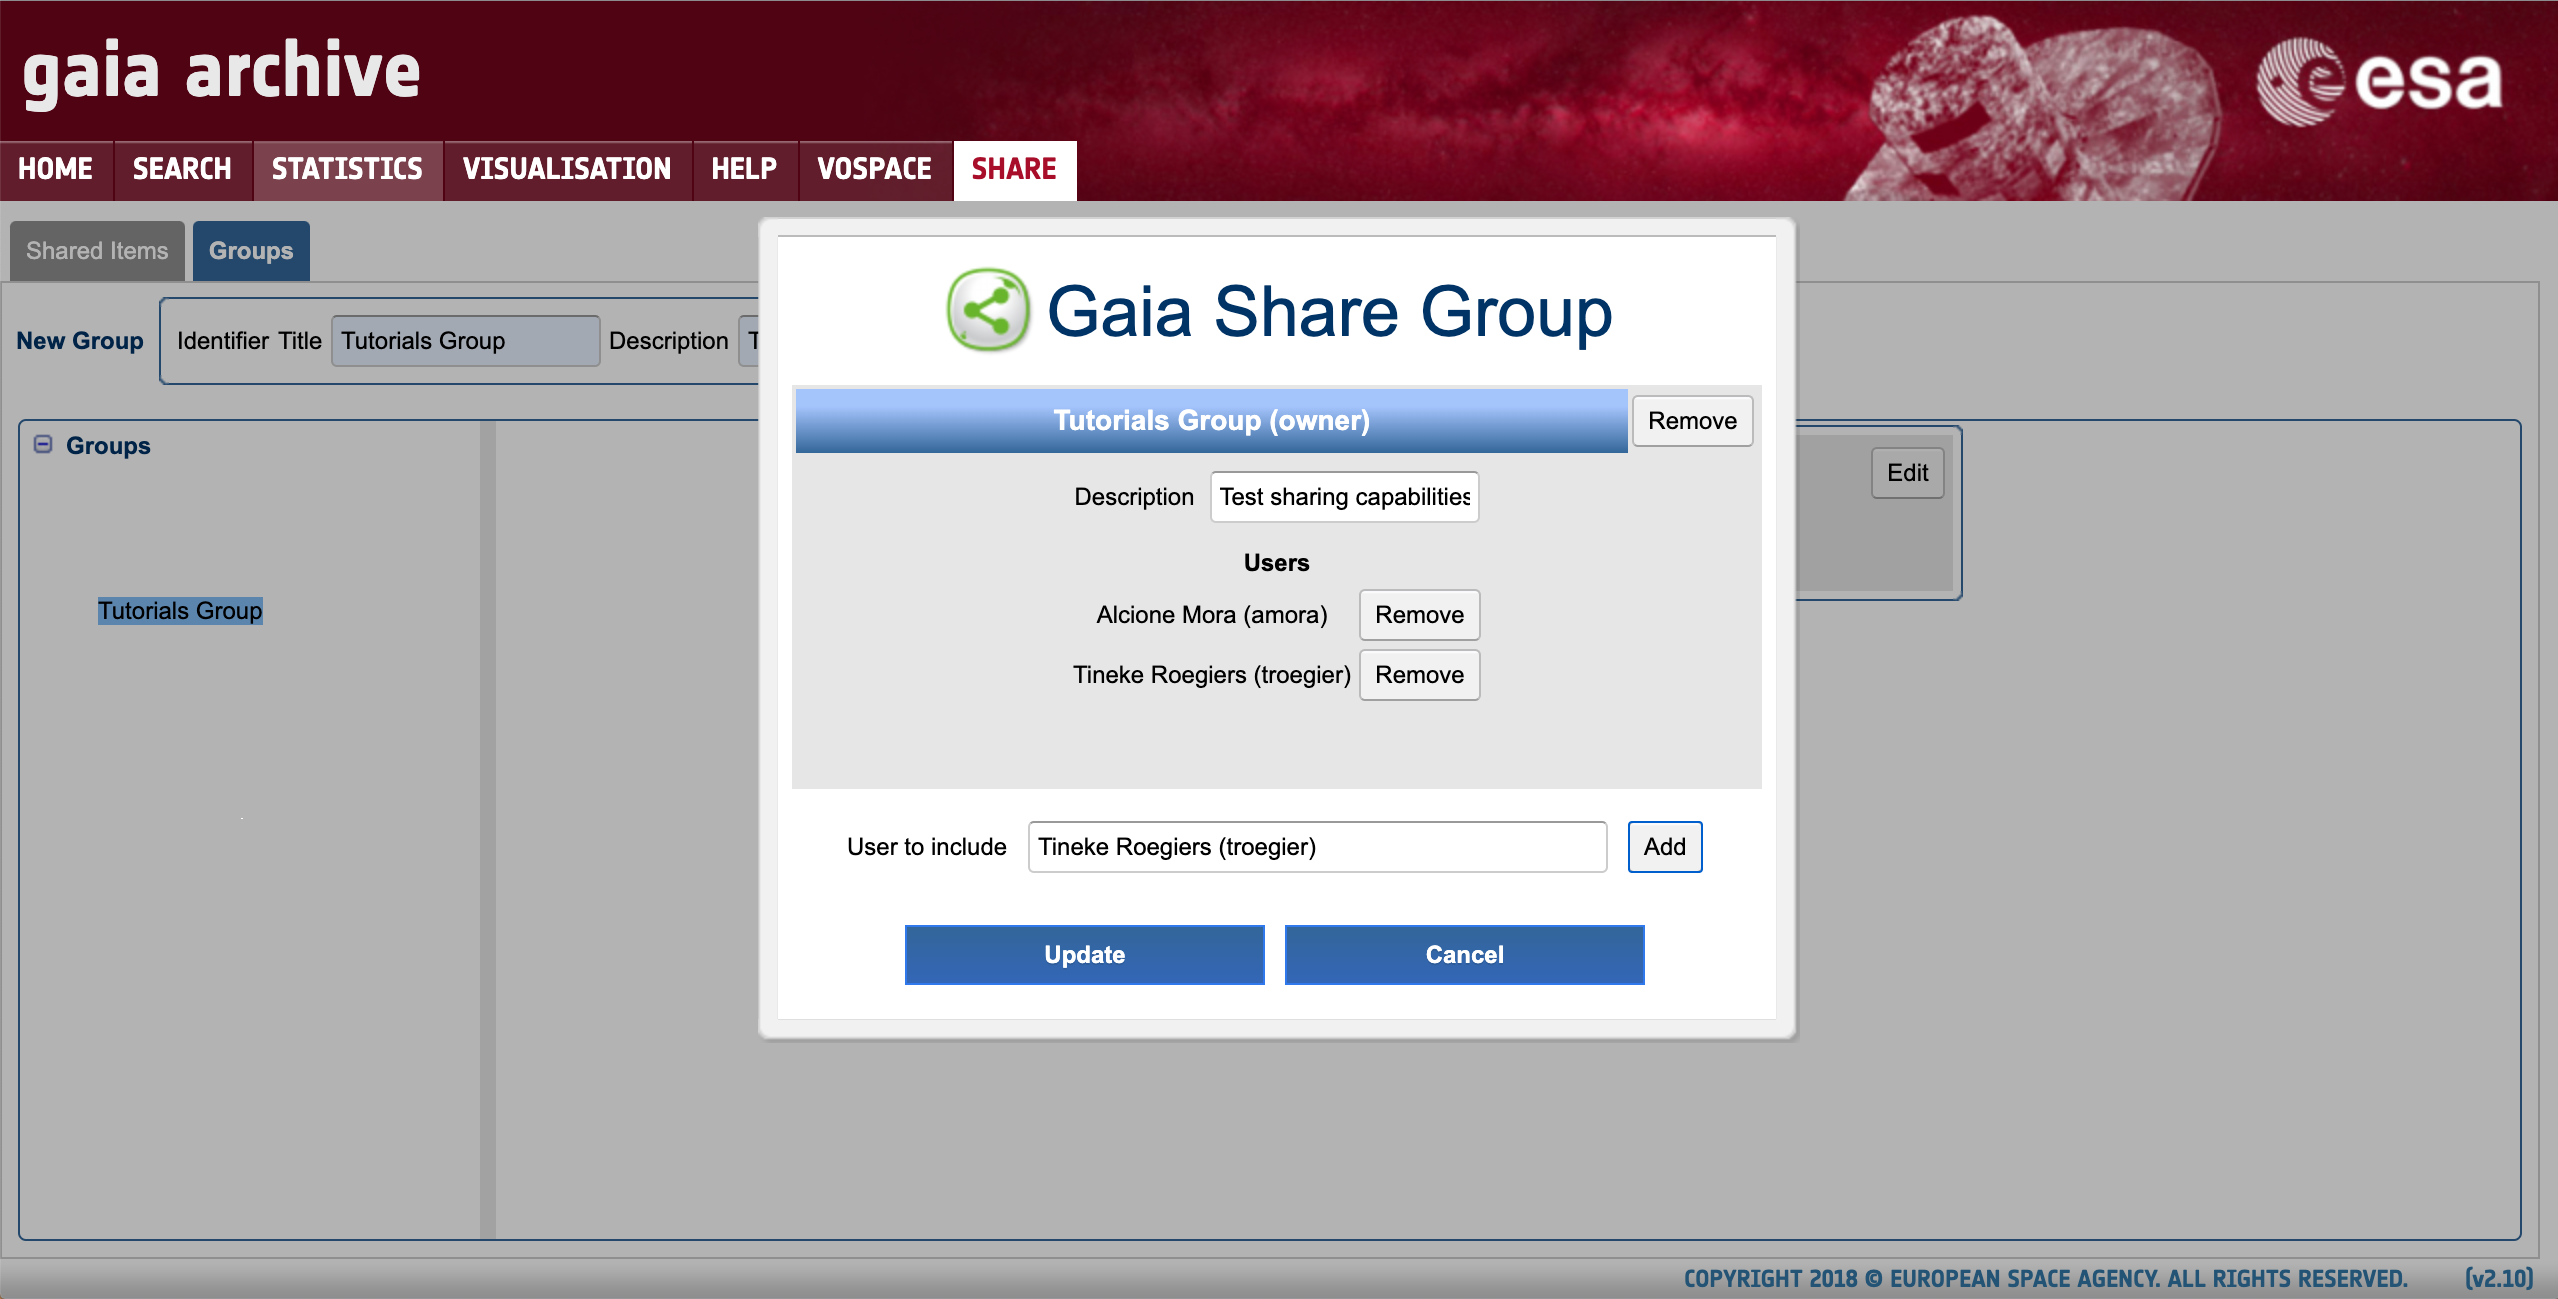
Figure 2: Content of the SHARE > Groups tab. The groups that the user belongs to are listed under the "Groups" schema on the left side of the window. A pop-up window appears after clicking with the cursor on top of the group name.
how do I know if another user is sharing a table with me?
When another (registered) user shares a table with you, a notification (a red bell icon) appears next to your user name in the top right corner of the GUI (see Fig. 3). The name of the table that has been shared to you will show up by clicking on top of the notification icon. The shared table is listed under the "Shared to me" TAP schema (see Fig. 4). At this stage you can execute ADQL queries on the table or easily inspect its content by clicking on top of its name (see Fig. 3 in the "Upload a user table" tutorial).
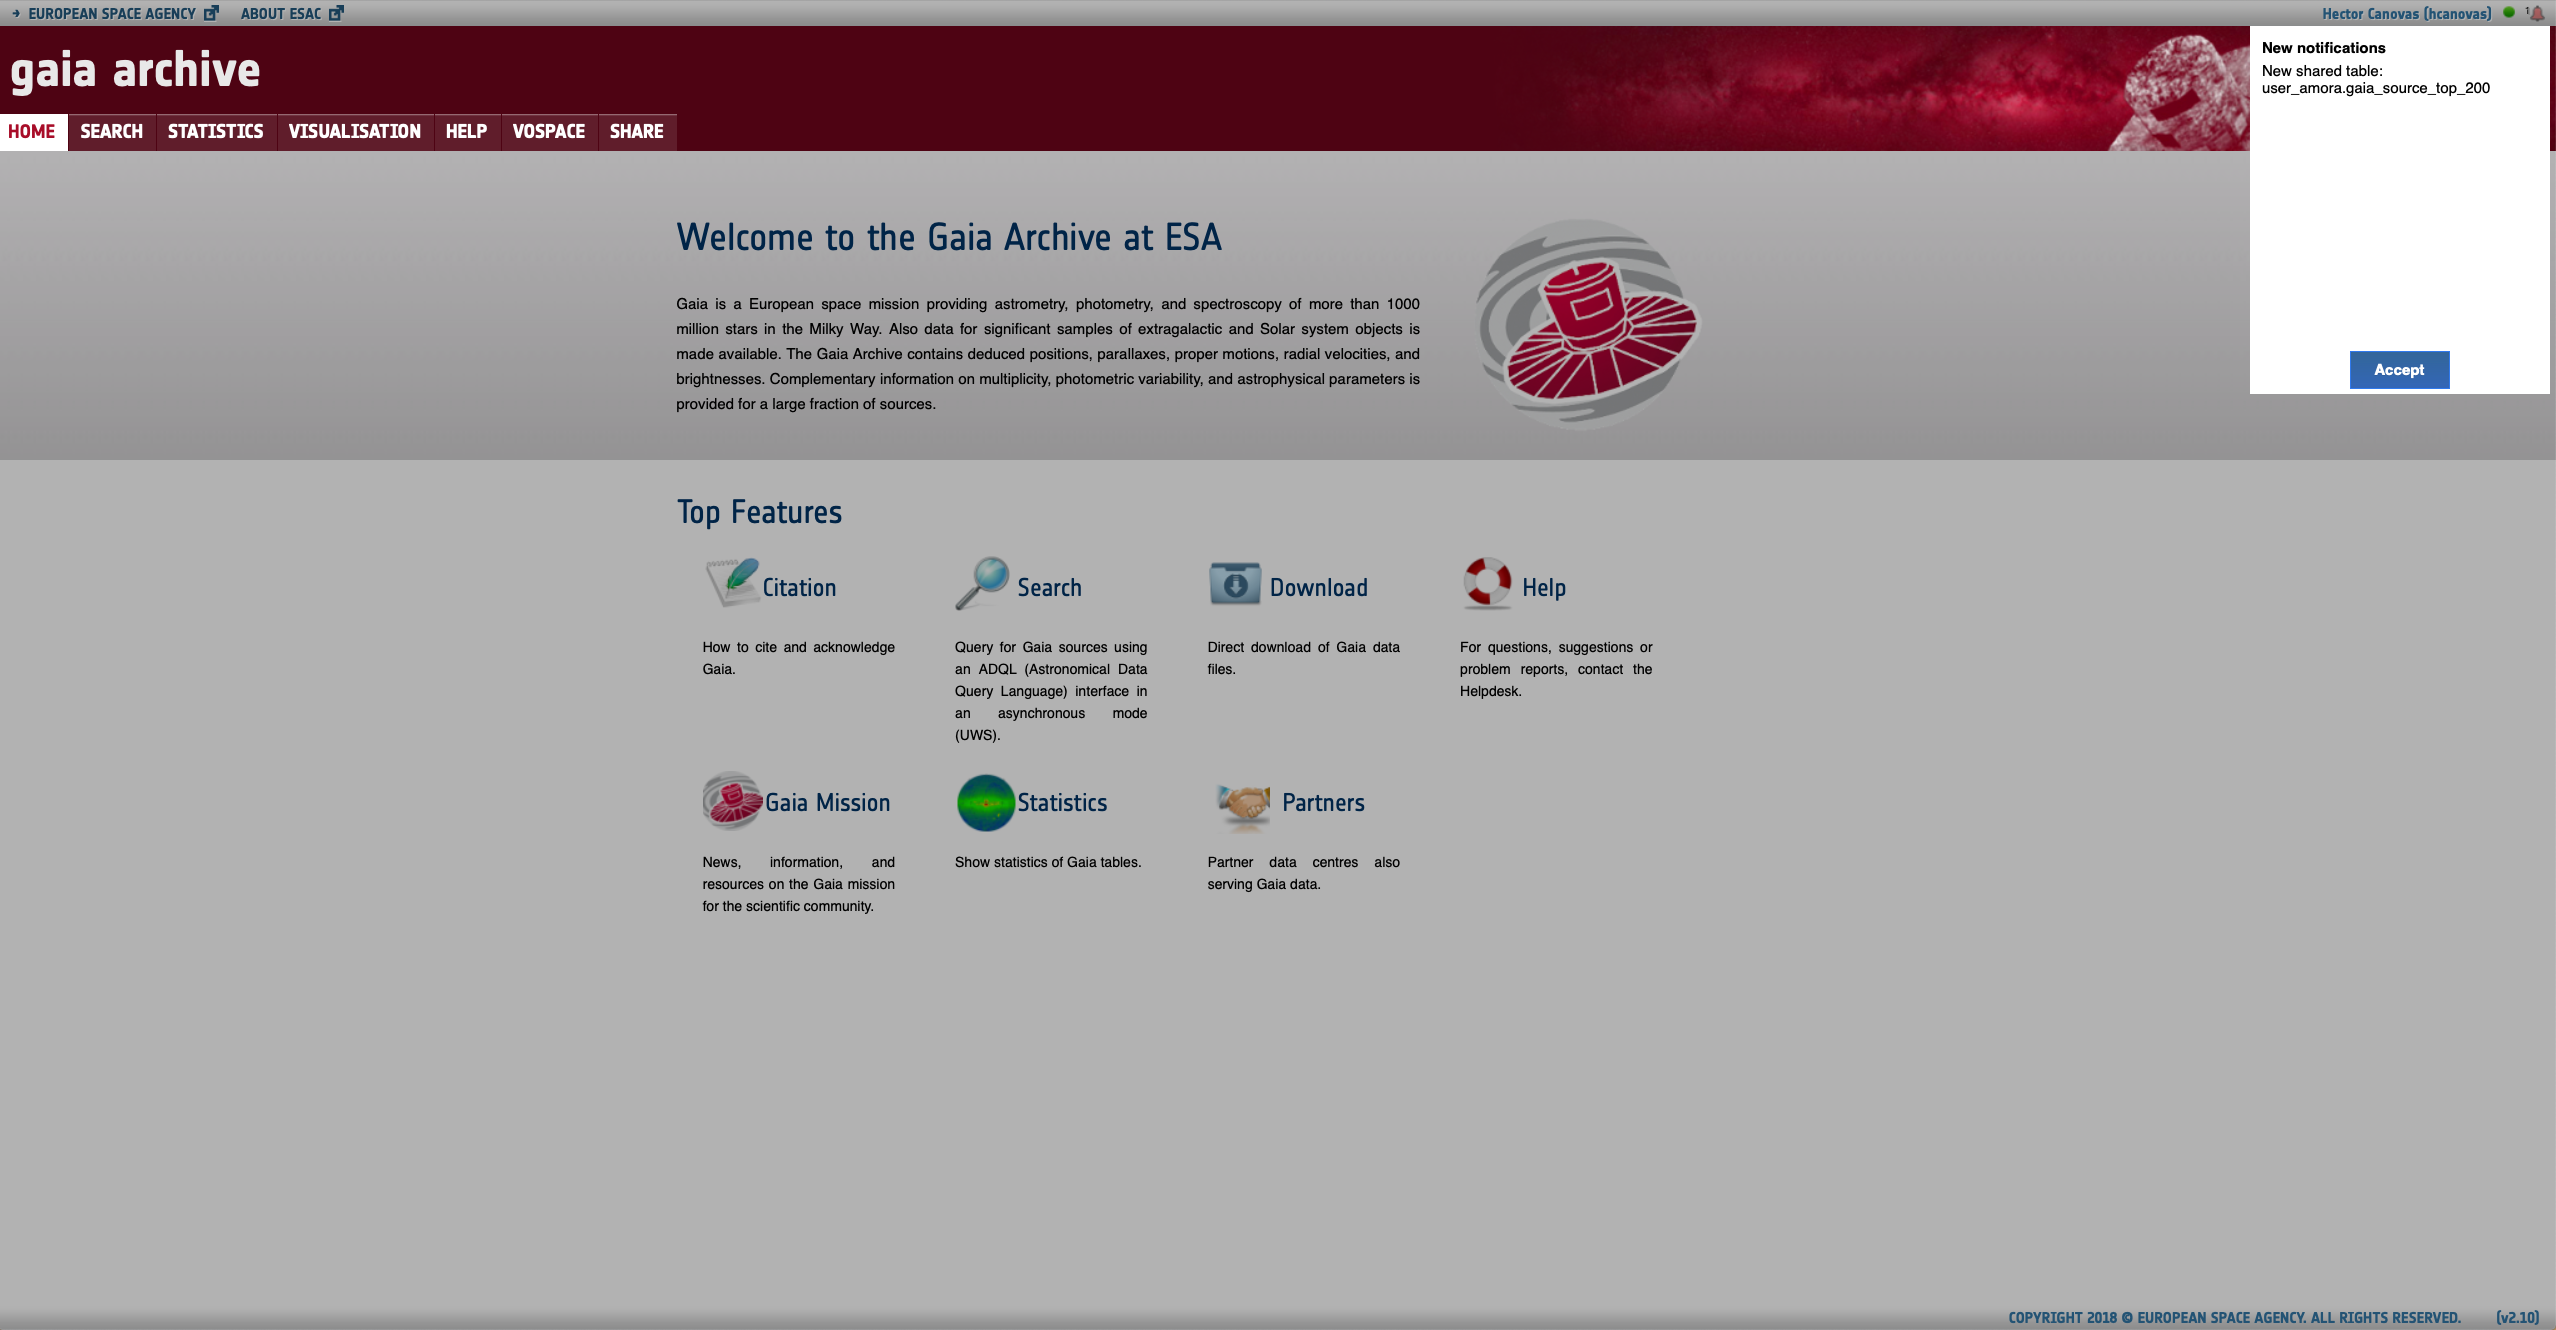
Figure 3: The red bell icon on the top right corner indicates that there is new information to be disclosed. In this example the notification informs that the "gaia_source_top_200" table created by the Archive user "amora" has been shared with you.
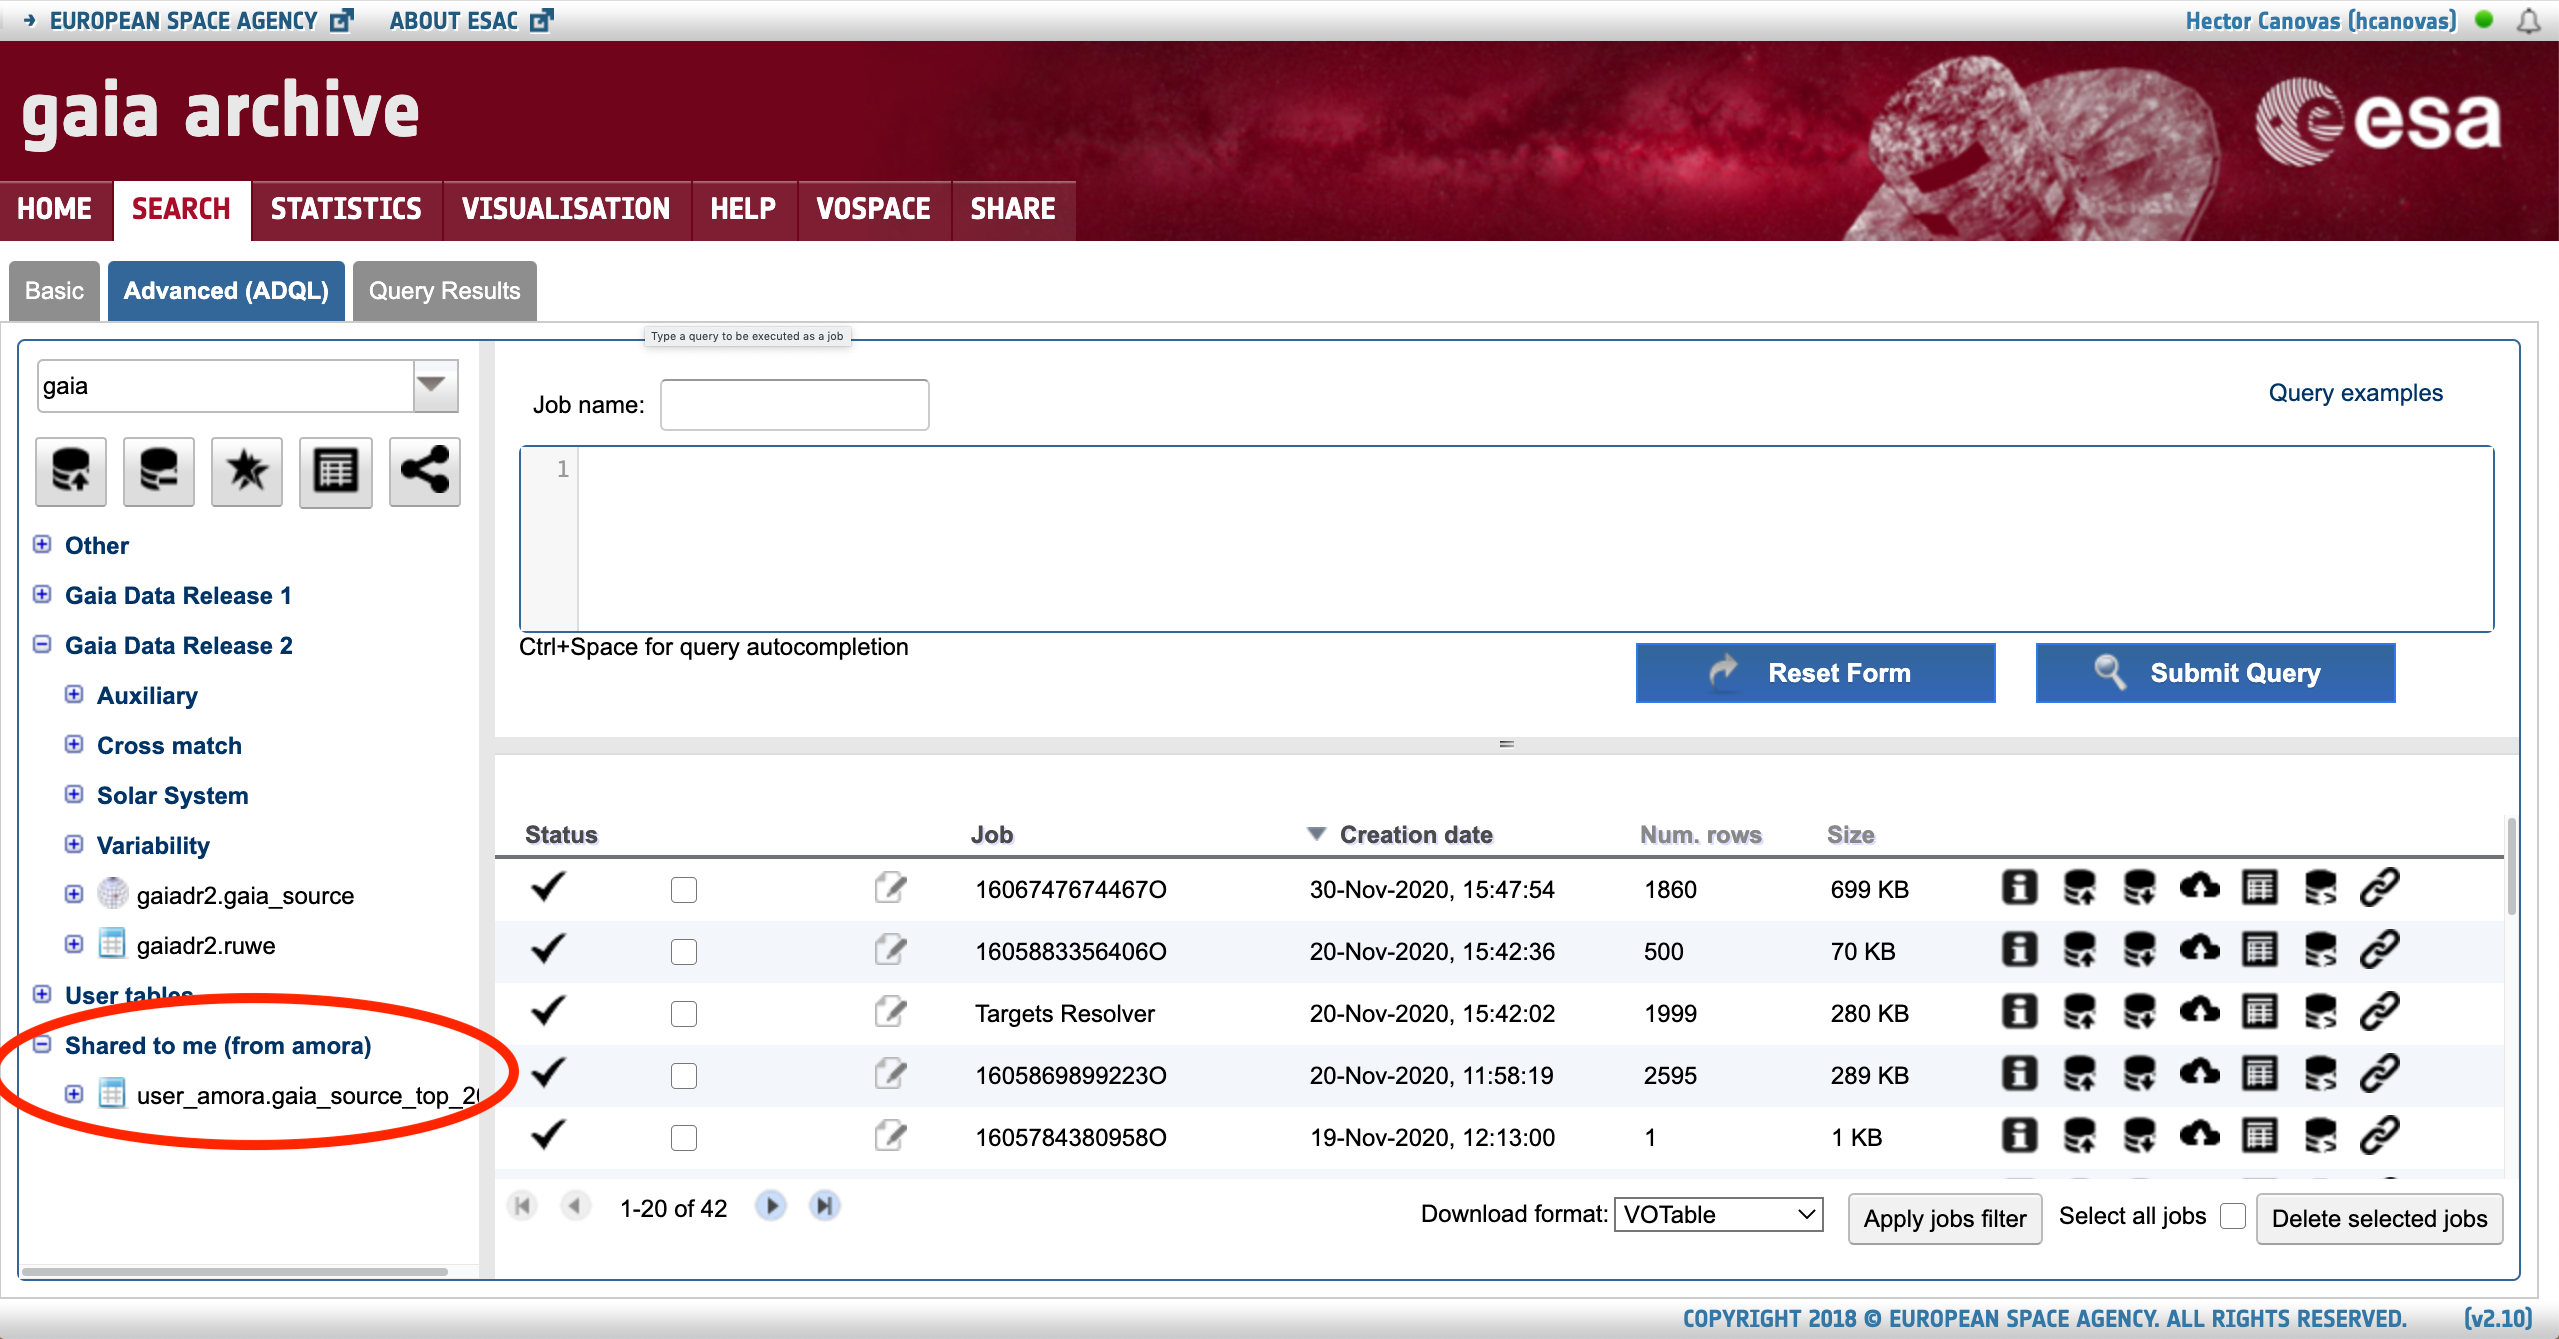
Figure 4: The shared table appears under the "Shared to me" TAP schema that is encompassed by a red ellipsoid in this figure.