SAS Thread - pn xmmselect spectrum - XMM-Newton
How to extract PN spectra of a point-like source and associated matrices using the SAS GUI
|
Introduction This thread describes how to extract the spectrum of a point-like source observed with the PN cameras using the SAS Graphical User Interface (GUI). Expected Outcome The final outcome of this thread is the standard suite of spectral products required by spectral analysis packages such as XSPEC:
SAS Tasks to be Used Prerequisites
Useful Links This thread makes use of the image display software ds9. Last Reviewed: 25 MAY 2023, for SAS v21.0Last Updated: 24 May 2022 |
Procedure
This thread contains a step-by-step recipe to extract PN spectra of a point-like source observed in Imaging mode and to create the associated response matrices, starting from a calibrated, concatenated event list (either produced with epproc or available as PPS product; here it bears the file name PN.evt). The content of this thread is the same as the thread to extract pn spectra for point-like sources (command-line version). Here, however, the extraction of scientific products is done using the SAS task xmmselect. This is a user-friendly, graphical interface to the SAS extractor (evselect), which allows you to create a wide range of scientific products (images and pseudo-images, time series, spectra, histograms), and screen the data prior to any product accumulations. xmmselect takes advantage of the full integration between SAS and plotting tools such as grace and ds9, to define data selection regions on a 1-D (light curve) or 2-D (image) plane.
- Set up your SAS environment (following the SAS startup Thread)
- If necessary, create a PN cleaned and filtered for particle background event file for your observation (see the How to filter EPIC event lists for flaring particle background Thread). Let's assume that a filtered file has been created, with name: PNclean.fits
- Start xmmselect
xmmselect table=PNclean.fits &
First a window pops-up, asking if you wish to visualise the "[...] selection expression [...]" corresponding to "[...] data subspace information [...]". In practise, xmmselect is asking you if you wish to see the data screening expression, which was employed to generate the event list. The answer to this question does not affect the following steps.
The xmmselect call pops-up a window as shown in Fig.1.
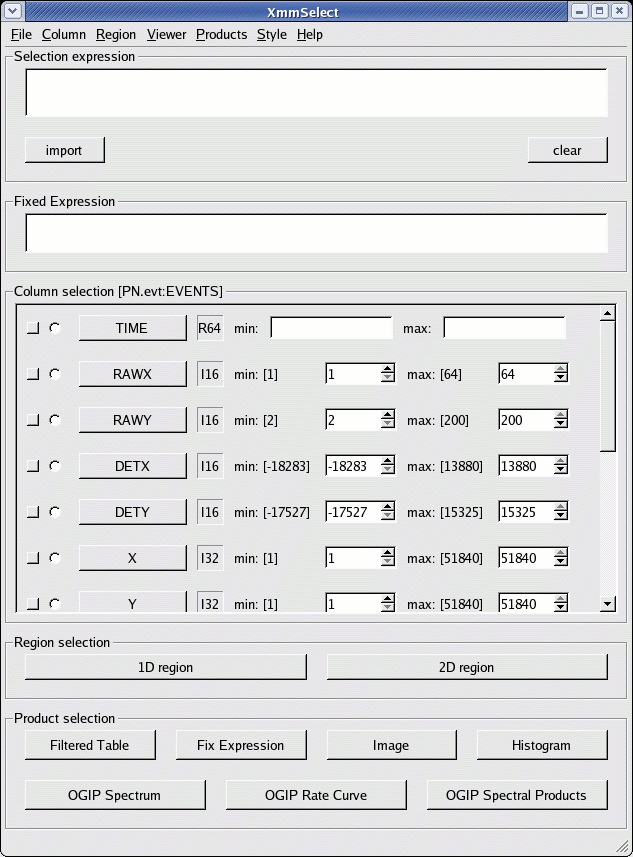
Fig.1: The main xmmselect window
In this window, we identify:
- Extract an image (sky coordinates in this example; extraction in detector - DET[XY] - coordinates is possible as well, and may be preferable for some specific scientific needs).
This is accomplished by:
- in the data screening widget:
- use #XMMEA_EP && (FLAG==0)
- use (PATTERN<=4)
- use (PI in [300:10000])
- clicking the square check-box besides X and Y in the data column xmmselect panel
- click on Image
- go to the Image sub-panel in the evselect window (see Fig.2)
- change at least the file name in the imageset window (e.g. to PNimage.fits)
- click Run

Fig.2: The Image panel in the evselect window
xmmselect will automatically launch a ds9 window on the created image - in the data screening widget:
- Select the region, from which the spectrum shall be accumulated, using the Regions/Shape/Circle in ds9 (see Fig.3)
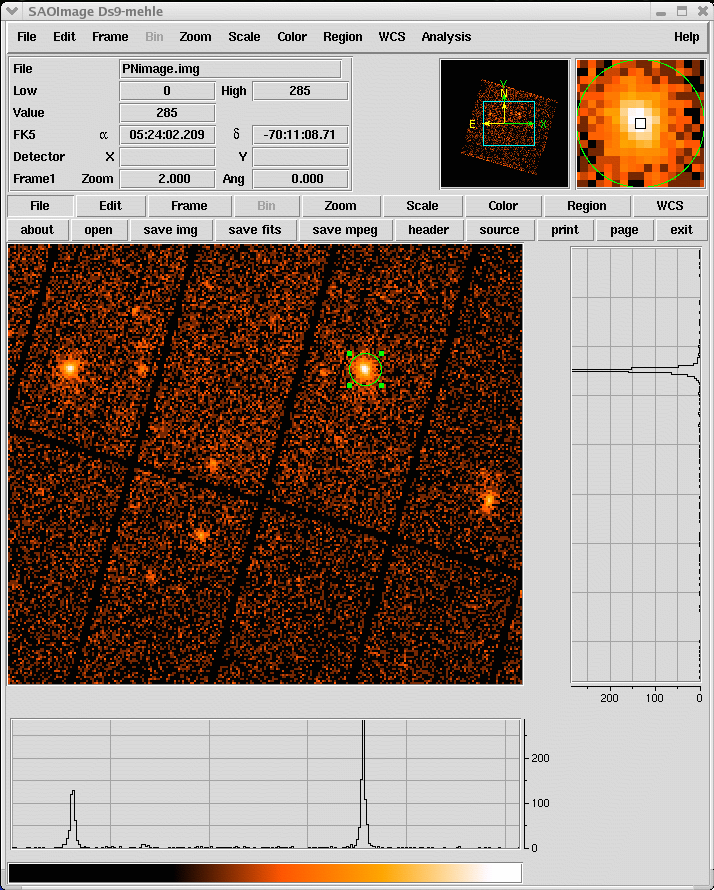
Fig.3: ds9 main window. A circular region (green circle) has been defined using the highlighted menu. - Propagate the selected region into the xmmselect data screening panel, by clicking the 2D region button
- Extract a source spectrum, using all the selection expressions defined so far, and restricting the patterns to single and doubles. It is important to check withspecranges and use the following spectral bin range, specchannelmin=0 and specchannelmax=20479, to accumulate the spectrum (see Caveats):
- click the circular button close to PI in the data column xmmselect panel
- click OGIP Spectrum
- go to the Spectrum sub-panel in the evselect window (see Fig.4)
- define the binning parameters:
- withspectrumset active
- spectrumset=PNsource_spectrum.fits
- spectralbinsize=5
- withspecranges active
- specchannelmin=0
- specchannelmax=20479
- click Run
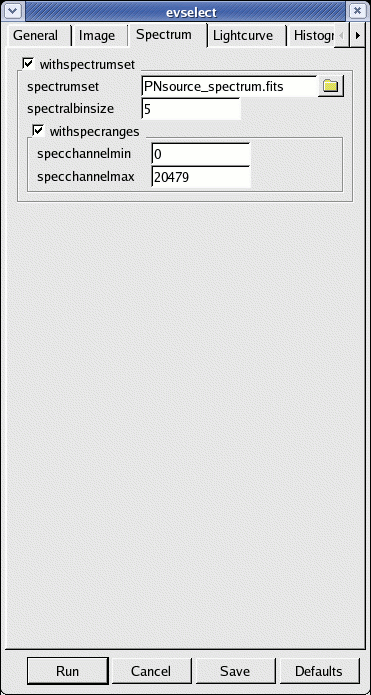
Fig.4: The Spectrum panel in the evselect window - Extract a background spectrum using the same steps 2. to 4. above. Have a look at the "EPIC status of calibration and data analysis" document (XMM-SOC-CAL-TN-0018) for latest recommendations on how to select source and background regions. In the following, we assume that the background is extracted from a source-free region at the same distance to the readout node (RAWY position) as the source region. If this is not possible, in order to ensure similar low-energy noise you should aim to select the background from the same CCD or same quadrant of the source region.
If you are interested in learning how to extract the background spectra from blank sky event lists, please go to the How to extract background spectra from blank fields event lists thread.
From now onwards one does not need to use xmmselect any longer. - If you want to correct the source spectrum for Out-of-Time events, consult the Dealing with EPIC Out-of-Time (OoT) events Thread.
- Generate a redistribution matrix
Currently there are two possible approaches:
a) use the SAS task rmfgen to create a redistribution matrix for your previously extracted spectrum:
- rmfgen -d. The GUI launch interface will appear (see Fig.5)
- define the following quantities:
- spectrumset=PNsource_spectrum.fits
- rmfset=PN.rmf
NOTE: This can take long (>30 min) on low performance computers...

Fig.5: The rmfgen launch GUI interface
b) use the ready-made (canned) response matrices. - Generate an ancillary file (for extended sources use extendedsource=yes detmaptype=flat or dataset)
NOTE: arfgen reads in the pattern range from the Data Sub Space (DSS) information in the spectrum dataset, and accumulates the quantum efficiency curves over those patterns, which is then combined to the other constituents of the ARF. Be aware that the entire range of allowed patterns are assumed if no pattern range is found in the DSS.
- launch the arfgen GUI interface (see Fig.6)
arfgen -d
- define the following parameters
- spectrumset=PNsource_spectrum.fits
- arfset=PN.arf
- withrmfset=yes (on calibration panel)
- rmfset=PN.rmf (on calibration panel)
- badpixlocation=PNclean.evt (on effects panel)
- detmaptype=psf (on detector map panel)
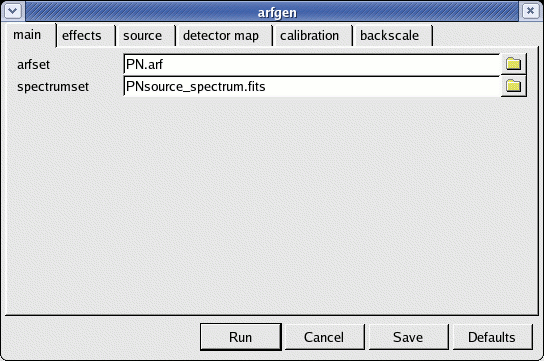
Fig.6: The arfgen launch GUI interface
As of SAS 20.0, a new correction is available through the arfgen call to align the PN and NuSTAR spectral shapes better (see Caveats).
- launch the arfgen GUI interface (see Fig.6)
- Rebin the spectrum and link associated files. In the following example the spectrum is rebinned in order to have at least 25 counts for each background-subtracted spectral channel and not to oversample the intrinsic energy resolution by a factor larger then 3.
- launch the specgroup GUI interface (see Fig.7)
specgroup -d
- define the following parameters
- spectrumset=PNsource_spectrum.fits
- groupedset=PN_spectrum_grp.fits
- backgndset=yes
- backgndset=PNbackground_spectrum.fits
- withCounts=yes
- mincounts=25
- withoversampling=yes (on panel 1)
- oversample=3(on panel 1)
- witharfset=yes (on panel 2)
- arfset=PN.arf (on panel 2)
- withrmfset=yes (on panel 2)
- rmfset=PN.rmf (on panel 2)
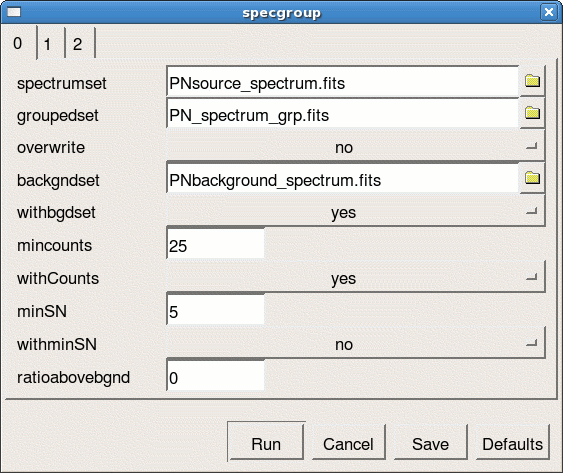
Fig.7: The specgroup launch GUI interface
The rebinning options shown in the example above, are by no means the only possible binning available, or the recommended one, more binning options are available in the description of the task specgroup. - launch the specgroup GUI interface (see Fig.7)
- Fit the grouped spectrum: PN_spectrum_grp.fits
|
Caveats |