HCV Help - HST
HCV Explorer Help
Introduction
The HCV Explorer is a visualisation tool to explore the Hubble Catalog of Variables (HCV) and offers interactive and connected plotting of the HCV catalog in the sky, in light curves, in plots and in a results table. The tool has recently been migrated into the eHST archive from a standalone interface. The following help describes the catalog, how to use the HCV Explorer tool via the user interface and via programmatic access, and provides some example use cases:
- About the Hubble Catalog of Variables
- How to use the HCV Explorer
- Programmatic access and Jupyter notebooks
If you can not find the information you need within these help pages, or you want to provide us with feedback or suggestions, please contact our helpdesk or email technical support at hsthelp 'at' cosmos.esa.int
When accessing the HCV Explorer, we recommend using any of the following latest browser versions:
- Google Chrome
- Apple Safari
- Mozilla Firefox
- Microsoft Edge
JavaScript and cookies will need to be enabled on any browser in order for the tool and its features to work properly.
If you need further assistance, please email technical support.
About the Hubble Catalog of Variables
- Release: 1.0 (September 2019)
-
Reference: Bonanos et. al. 2019
The Hubble Catalog of Variables (HCV) is the first full, homogeneous, catalog of variable sources found in the Hubble Source Catalog (HSC), which is built out of publicly available images obtained with the WFPC2, ACS and WFC3 instruments onboard the Hubble Space Telescope. The HCV is the deepest catalog of variables available. It includes variable stars in our Galaxy and nearby galaxies, as well as transients and variable active galactic nuclei. In total, the HCV includes 84,428 candidate variable sources (out of 3.7 million HSC sources that were searched for variability) with V ≤ 27 mag; for 11,115 of them the variability is detected in more than one filter. The data points in a light curve range from 5 to 120, the time baseline ranges from under a day to over 15 years, while ∼8% of variables have amplitudes in excess of 1 mag.
| Column Name | Units | Description |
|---|---|---|
| Source | - | The source identifier (or match ID of the source; MatchID in HSCv3, details here). |
| GroupID | - | Unique identifier for the image group of overlapping images that is taken as the ImageID of some white light image within the group (GroupID in the HSCv3 Groups table). |
| Subgr. | - | Subgroup identifier. Very large groups have been split into subgroups. A value of "-5" denotes that the group was processed as one subgroup. |
| R.A. | degrees | Right ascension of source (J2000) |
| Dec. | degrees | Declination of source (J2000) |
| P.cl. | - | The pipeline classification. "1" corresponds to a single-filter variable candidate (SFVC), while "2" corresponds to a multi-filter variable candidate (MFVC). |
| E.cl. | - | The expert classification flag: "0" indicates a variable candidate "not classified by the experts", "1" indicates a "high confidence variable", "2" indicates a "probable variable", "4" indicates a "possible artifact". |
| #Filters | - | Number of filters in which the source has been observed. |
| Filter | - | The instrument and filter name (Instrument and Filter in the HSCv3 DetailedCatalog table). |
| nLC | - | Number of points (epochs) in the light curve. |
| VarQual | - | Five letter quality flag for the source variability. Quantifies the deviation of each parameter (CI, D, MagerrAper2, MagAper2-MagAuto, p2p) from the average behaviour within the GroupID. Each letter can obtain the values A (highest quality), B, or C (lowest quality). |
| VarFil | - | Number flag for the variability in this filter (0 = non-variable, 1 = variable). |
| <m_HCV> | mag | Mean of the light curve's corrected magnitudes (if no corrected magnitude is available, this will be the mean of the light curve's HSC magnitudes). |
| <m_HSC> | mag | Mean of the light curve's HSC magnitudes. |
| MAD | - | The median absolute deviation (MAD) of the magnitude. |
| χ2red | - | Value of the reduced χ2 for the null-hypothesis of the source magnitude being constant. |
The HCV can be accessed and downloaded from a number of services such as the ESA Hubble Science Archive, the MAST Archive (HLSPs), and VizieR.
The HCV can be accessed and downloaded from a number of services such as the ESA Hubble Science Archive, the MAST Archive (HLSPs), and VizieR.
How to use the HCV Explorer
Getting Started
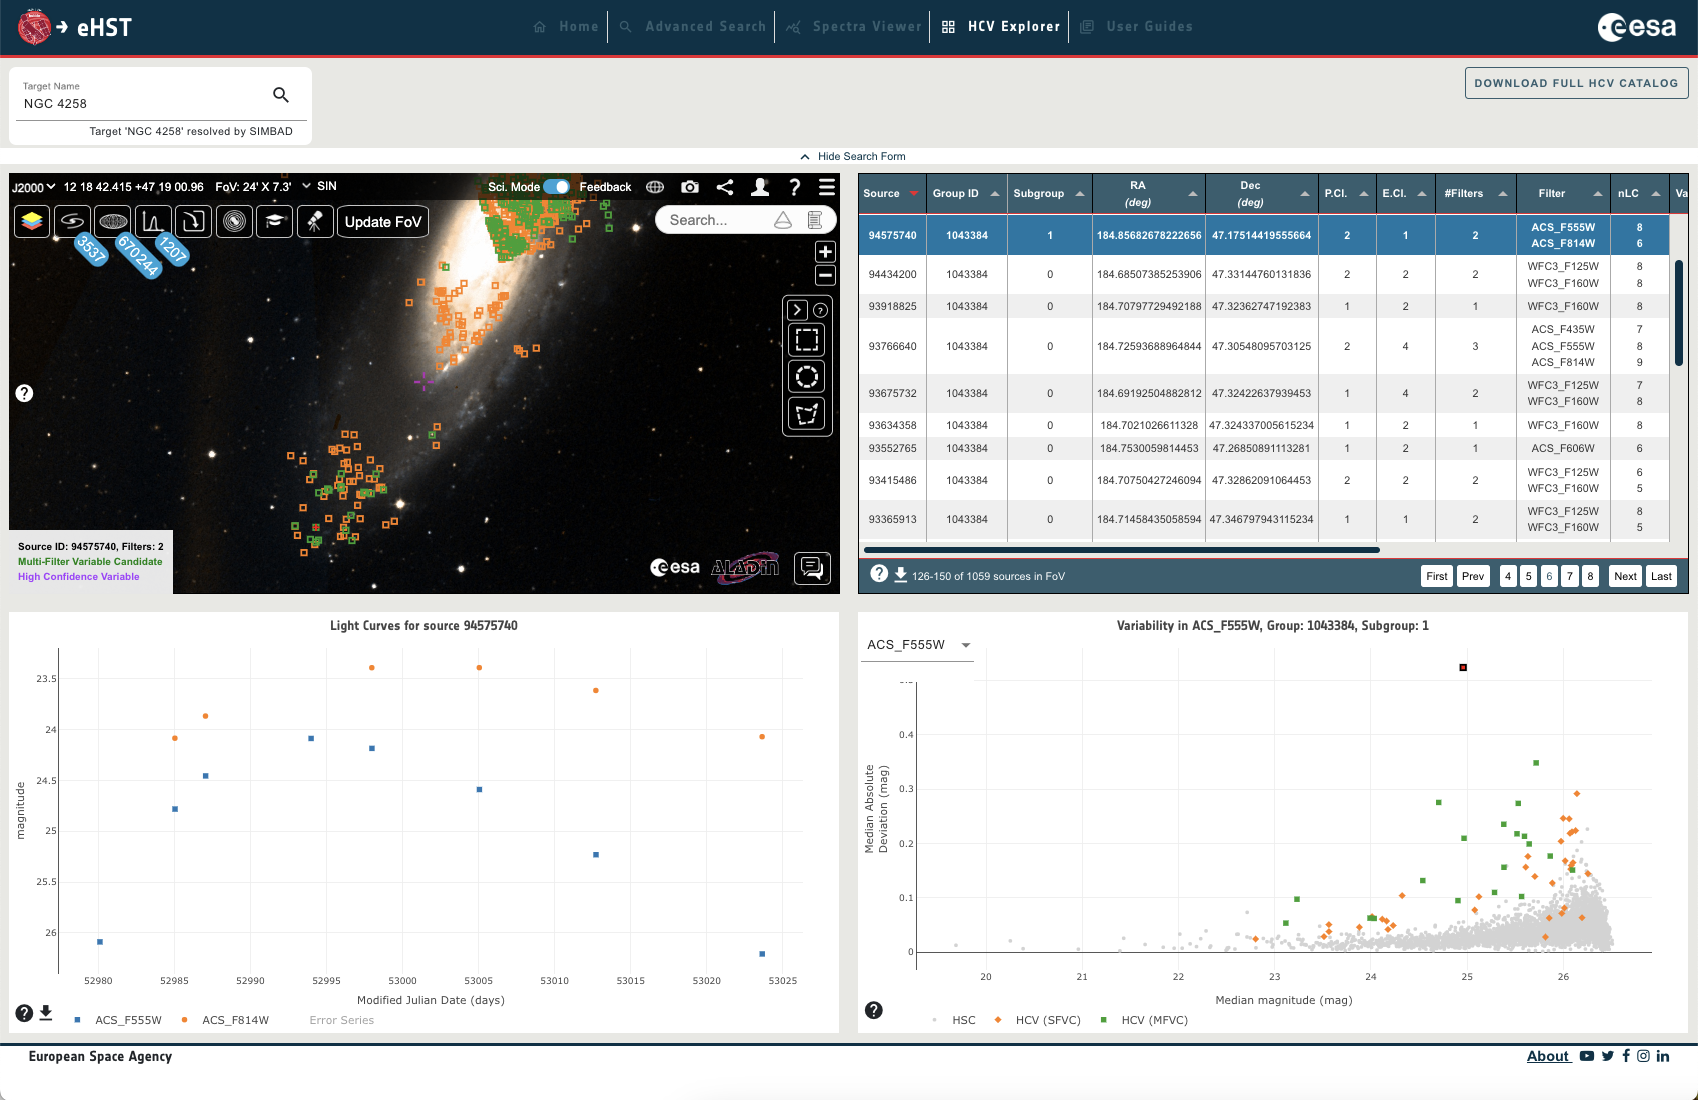
The HCV Explorer visualisation tool, developed by the ESAC Science Data Centre (ESDC), has been designed to aid the exploration of the HCV in an intuitive and visual manner, with exploration in a sky view, easy visualisation of source light curves in various filters, simple access to tabular results and downloading of data, and additional plotting features.
The user interface provides the following functionalities:
Search field

The search field is located at the top of the interface and accepts coordinates or an object name that can be resolved by SIMBAD. Currently only equatorial coordinates are accepted. Type the name, or coordinates, and click the search button, or click return, and the tool centres on this target in the sky view (top left of the interface). HCV sources found in the FoV are displayed in the sky view and table view (top right).
Sky view
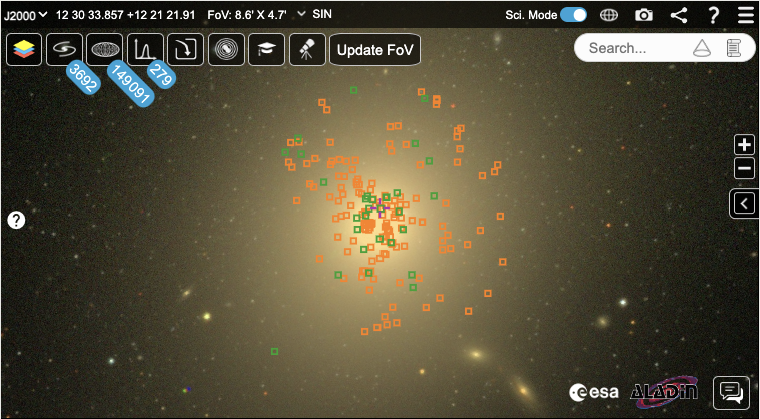
The sky view is located in the top left of the interface and uses ESASky. When a target is searched for, the sky view updates and centres on the object and any HCV sources found in the FoV are displayed in the sky view (and table view to the left).
As the cursor is moved around the sky, the coordinates in the top left update. Pan around the sky using your mouse and zoom in and out of the sky with the scroll wheel or the +/- buttons: 
If moving or zooming around the sky, clicking on the 'Update FoV' button will perform another search on the HCV catalog for the new FoV and will update the sources displayed in both the sky and table views. If the FoV is very crowded with sources, a limit is set to 2000 sources displayed in the sky, for browser performance reasons, and a message appears 'Showing brightest 2000 sources'. Zoom into the sky and click 'Update FoV' in order to load all the sources.
Clicking on a source highlights it in red and brings up a panel at the bottom of the sky view with a summary on the source: the SourceID number; the number of available filters for that source; the pipeline classification, i.e. single-filter variable candidate (in blue or orange) or multi-filter variable candidate (in green); and the expert classification, i.e. a high confidence variable (purple), a probable variable (light blue), a possible artifact (dark yellow) or that the object has not been classified by an expert (dark green):

Clicking on a source will also highlight the relevant row in the table view (top right in the interface) and will plot the source light curve(s) (bottom left) and median absolute devation plot (bottom right), see more information below.
The default background displayed in the sky is a Hierarchical Progressive Survey (HiPS) of the Digitized Sky Survey (DSS) in colour, more information here. To change the background HiPS, click on the manage layers button:

Note that the HCV/HSC coordinates are currently not aligned with the HST images from the HLA (there is an offset in the astrometry). The current version 3 of the HSC (used to produce HCV v1.0) has absolute astrometry based on the Gaia DR1 catalog, which is more accurate. The next version of the HLA images will also incorporate these corrections. See the HLA frequently asked questions for more details: http://hla.stsci.edu/hla_faq.html
Table view
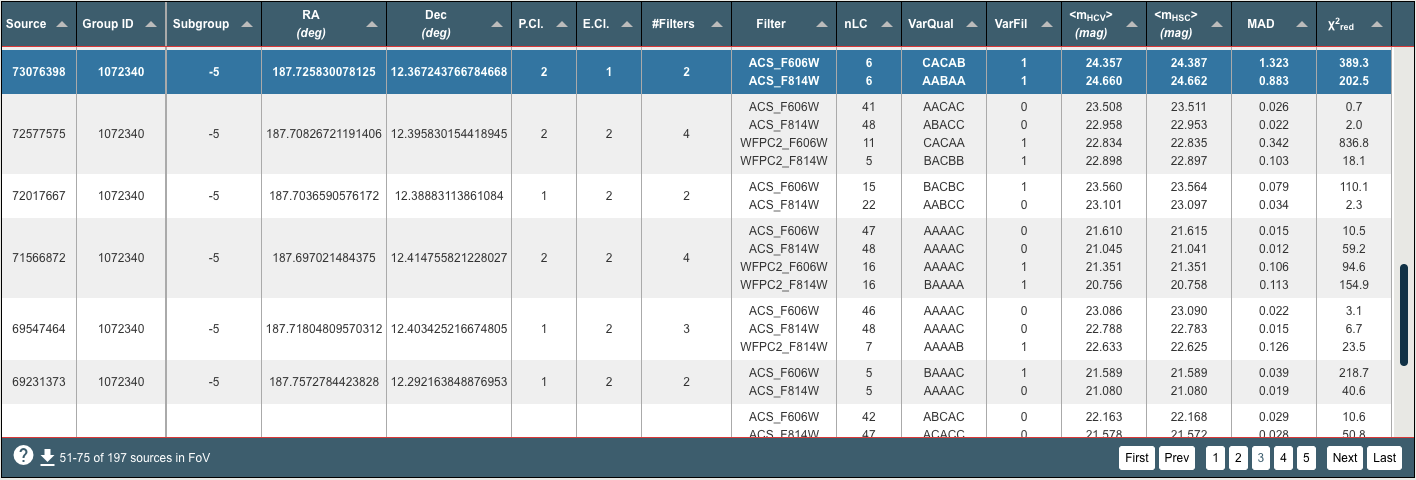
The results table is shown in the top right area of the HCV Explorer and lists all the HCV sources in the FoV of the sky view (top left). Hovering over the column header displays a summary description for each column. Many of the columns can be sorted by clicking on the column header. Clicking on a source / row will highlight the row and the relevant source in the sky view. It will also trigger plotting the source light curve/s (bottom left) and median absolute devation plot (bottom right), see more information below. A download button is located at the bottom left of the table, where the results table can be downloaded in various formats. When the limit of 2000 brightest sources has been applied to the results, downloading the results table will deliver the actual total number of sources in the current FoV.
Light curves
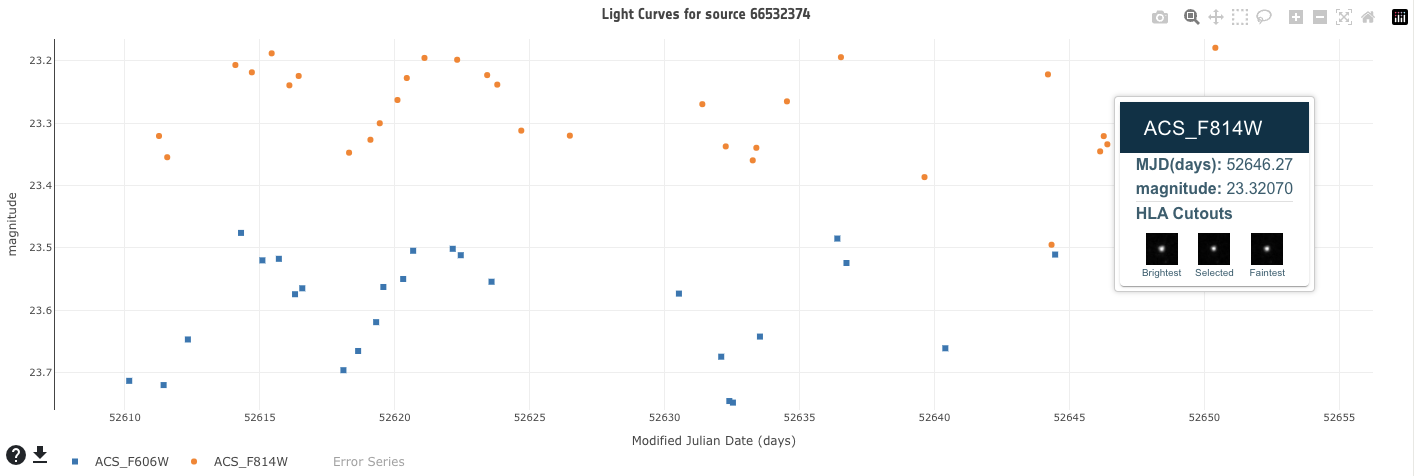
Light curves are plotted in the bottom left of the interface. To load a light curve, click on a source in the sky view or click on a source / row in the results table. All light curves in all available filters for the selected source are plotted. The plot is interactive. To zoom in, click and drag the mouse over the desired area to focus on. To zoom out, click the 'Autoscale' or 'Zoom out' button. Click on the filters in the legend to show and hide the points for the selected filters (by default they are all shown). Hover over each point to see the data values and the HLA cutout images around the selected source for the brightest point in the light curve, the faintest point in the light curve and the selected point in the light curve. This functionality is using the HLA cutout service from STScI. Click on each point in the light curve to view the HLA cutouts in a larger window. Each cutout can be downloaded and a link to the full HLA image in the EHST archive is provided. Before downloading and working with the catalog it is advised to inspect the HLA cutout images, for example to check that no artifacts are contaminating the source and may have potentially affected the automatic classification (see Bonanos et al. 2019 for a description). Click on the filters in the legend to show and hide the points for the selected filters (by default they are all shown). Click on 'Error Series' to plot the error bars. The light curves for the source can be downloaded in various formats via the download button, located to the bottom left of the plot. Before downloading, the HLA cutout images for each filter around the selected source for the brightest point in the light curve, the faintest point in the light curve and the currently selected point are again displayed. Additionally, the plot can be downloaded as a png by selecting the camera icon in the top right of the plot.
Plotting
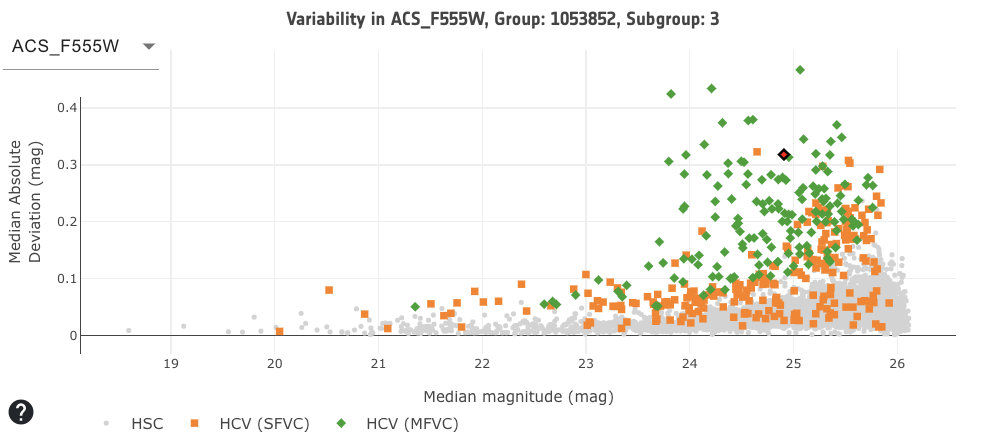
The bottom right area of the interface displays a plot of the median absolute deviation (MAD) of the magnitude versus the median magnitudes for the selected filter and group (and for some crowded regions, the subgroup). Plotted in green are the HCV multi-filter variable candidates: HCV (MFVC); in orange are the HCV single-filter variable candidates: HCV (SFVC); and in grey are the HSC sources for the selected filter and HSC group. This MAD plot indicates the scatter in a source's light curve, for the selected filter, and can be used as a variability index. As described in Bonanos et. al. 2019, 'The data processing pipeline calculated the median absolute deviation and used a 5 sigma threshold to select variable candidates. These were passed to the validation algorithm, which classified the sources as single or multi-filter variable candidates and assigned a variability quality flag to each source.' Note that some of the variable sources, especially the single-filter variable candidates, may be variable in a different filter to the one being plotted. To change the filter, click on the drop down menu to the top left of the plot and select a filter. Only available filters for the displayed group are listed.
The plot is interactive. To zoom in, click and drag the mouse over the desired area to focus on. To zoom out, click the 'Autoscale' or 'Zoom out' button. Click on the legend to show and hide the HSC, HCV (SFVC) and HCV (MFVC) points (by default they are all shown). The selected source is highlighted in red. Any source can be selected and will trigger the light curve plot to be reloaded, for this selected source, and will highlight the source in the sky and results table. The plot can be downloaded as a png by selecting the camera icon in the top right of the plot.
Downloading

The full HCV catalog, including all light curves, can be downloaded via the 'Download FULL HCV Catalog' button at the top right of the interface. Different formats are available for download, such as CSV, VOTable, FITS, and JSON and can be chosen in the drop down menu when clicking the button. Additionally, the results from a search can be downloaded via the button at the bottom left of the table view: 

Before downloading and working on the catalog data it is advised to take a look at the HLA image cutouts of each source of interest. Before downloading light curve data, a preview of each of the filter's brightest, median and faintest HLA cutouts is provided in a window for review.
Programmatic access and Jupyter notebooks
Introduction
The HCV, and the ESA Hubble Science Archive (EHST) database content, can be queried via the Table Access Protocol (TAP) (see: https://www.ivoa.net/documents/TAP/).
The default query language for TAP is the Astronomical Data Query Language (ADQL), which includes most features of SQL plus some spatial search functions.
TAP services can process synchronous (immediate) or asynchronous (batch job) queries.
The EHST TAP can be accessed via TOPCAT, via command line, or via astroquery.
EHST TAP VIA TOPCAT
The following describes how to access the HCV using the EHST TAP via TOPCAT.
- Run TOPCAT in your local environment (you can install TOPCAT from: https://www.star.bris.ac.uk/~mbt/topcat/#install ).
- Go to the top menu of TOPCAT, select "VO" and then "Table Access Protocol (TAP) query".
- In "Select Service", introduce the following TAP URL at the bottom of the window, in "Selected TAP Service":
http://hst.esac.esa.int/tap-server/tap/and click on "Use Service". - Alternatively, search for "ESA" in the Keywords field, choose the Hubble TAP, and click on "Use Service".
- On the left side of the Metadata panel, select the Tables to be queried. There you will see a drop down menu for the HCV.
- Once a table is selected click on "Columns" on the right side of the panel to get information on the table parameters that can be queried. Click on "Table" to get the description.
- Introduce query commands in the ADQL Text panel below. The examples provided can be edited (click on the "Examples" button).
- When clicking on "Run Query" the selection is sent to TOPCAT.
EHST TAP VIA Command line
The following describes how to access the HCV using the EHST TAP via command line. The structure of a TAP query depends on whether the query is synchronous or asynchronous. For both cases the main query parameters are REQUEST, LANG, QUERY, FORMAT and UPLOAD (to upload a table). See the description of these parameters in section 4.
- The full list of public table names and columns can be found via Topcat or by:
curl -o tables.xml "https://hst.esac.esa.int/tap-server/tap/tables" - Synchronous queries.
The retrieved results from a synchronous query is a VO table by default (see the parameters in section 4. to specify a different output format). The results can be saved in a file and inspected using any analysis tool like TOPCAT, for instance.results from synchronous queries.
Examples:
Query the HCV for the top 1000 sources and return a csv file.curl -o top1000.csv "https://hst.esac.esa.int/tap-server/tap/sync? REQUEST=doQuery&LANG=ADQL&FORMAT=csv&QUERY=SELECT+TOP+100+*+FROM+hcv.hcv"
Query the HCV centred on M87, in a 15 arcminute circle of radius, and return all columns in a csv file.curl -o file.csv "https://hst.esac.esa.int/tap-server-dev/tap/sync? REQUEST=doQuery&LANG=ADQL&FORMAT=csv&QUERY=SELECT+*+FROM+hcv.hcv+ WHERE+1=contains(point('ICRS',cra,cdec),circle('ICRS',187.70593,+12.39112,0.25))" - Asynchronous queries.
curl -i -X POST --data "PHASE=run&LANG=ADQL&LANG=ADQL&REQUEST=doQuery&QUERY=select+top+500+*+from+hcv.hcv" "https://hst.esac.esa.int/tap-server/tap/async"
The response will contain the URL of the job running at the server side (see Location header):HTTP/1.1 303 303 Date: Thu, 12 Dec 2024 18:20:34 GMT Server: Apache/2.4.6 (Red Hat Enterprise Linux) OpenSSL/1.0.2k-fips mod_jk/1.2.48 Location: https://hst.esac.esa.int/tap-server/tap/async/1734028325571O Content-Type: text/plain; charset=UTF-8
To obtain the status of the running job run:curl "http://hst.esac.esa.int/tap-server/tap/async/1461057634887D"
To obtain the results of the job (once the job is finished) run:curl "http://hst.esac.esa.int/tap-server/tap/async/1461057634887D/results/result" - Here are the parameter descriptions for an asynchronous/synchronous query:
Parameter Value Comments REQUEST doQuery Requests to execute the provided query LANG ADQL Query language FORMAT - votable_plain
- votable
- csv
- jsonResults output format QUERY ADQL query Query
Jupyter notebooks
HST Python Tutorial: Hubble Catalog of Variables light curve period analysis
This notebook shows you how to access the HCV using the EHST TAP via astroquery and provides some example use cases such as:
- Querying the HCV for a particular object or performing a cone search.
- Plotting the light curves as a function of observation date.
- Computing the Lomb-Scargle periodogram of the light curve in one band.
- Phase and plotting the light curve.
- Downloading an associated HLA image.
- Plotting sources on an associated HLA image.
- Visualising cutouts of HLA images.
Download the notebook:
- Removed a total of (19) style text-align:center;
- Removed a total of (1) style text-align:justify;
- Removed a total of (1) align=center.
- Removed a total of (2) border attribute.
- Removed a total of (2) cellpadding attribute.
- Removed a total of (2) cellspacing attribute.
- Converted a total of (1) youtube to youtube-nocookie.


























 Sign in
 Science & Technology