
 Sign in
SAS Thread - omf - XMM-Newton
OM data reduction with SAS: fast mode data processing chain
|
Introduction The thread explains how to process OM fast mode data to obtain light curves of the source(s) present in the fast mode observing window. Expected Outcome OM threads describe how to process OM data using the corresponding chains within SAS. They give also some advice and hints on the checkings to be done on output SAS products to assess the quality of these output products. SAS Tasks to be Used Prerequisites Before running any of the OM chains users should check in the ODF what type of data they have: images, fast mode, and/or spectral images obtained with the grisms. Then the corresponding chain(s) can be run. Running a chain that does not correspond to the type of data will give a fatal error and it may produce some confusion to the user. A proper set up of SAS is mandatory. Useful Links Last Reviewed: 31 January 2025, for SAS v22.0Last Updated: 21 October 2014 |
Procedure
OM data processing from A to Z is performed by "chains": omichain, omfchain and omgchain for image, fast mode data and grism spectra respectively. These are perl scripts which start the different tasks in the proper order using the adequate parameters. The tasks can be run separately, out of the chain, however this may be cumbersome and prone to errors because each individual task needs input data generated by a previous one.
A detailed description of the processing chains (omfchain) as well as of each task can be found in the SAS documentation, both in HTML and Postscript format. A step by step description of the fast mode chain and examples of the processing by individual execution of all tasks is given in the SAS User's Guide and also at this location.
OM fast mode data are fully processed by the XMM-SAS Pipeline: for each exposure of a given observation all necessary corrections are applied to the data files. Then a pseudo-image is built from the corrected event list and a source detection algorithm is used to find the source (or sources) present in the fast window. The source found is then tracked throughout the event list to compute the count rates as a function of time for both source and background. A light curve will be derived for each source found in the fast window in each exposure.
In principle there is no need for further data reduction. The light curves produced by the Pipeline have a default sampling time of 10 seconds.
The whole data processing can be repeated easily by any user, should any calibration file be updated, and what is more important, in case of doubtful results: the pipeline applies default options in all SAS tasks which eventually can be changed by the user in order to improve the quality of the results. In particular, the source detection is very sensitive to the artefacts which are very common in OM. Changing the sampling time will also require a reprocessing of the data.
When comparing the data files obtained from the standard SSC pipeline with those obtained by running omfchain, the user will notice two differences, the PPS files are compressed while the products from omfchain are not, and in addition some intermediate files, with name starting with F, are preserved.
We outline here the checks that every User should perform on OM fast mode processed data (by the standard Pipeline or by running SAS) and the use of one of the tasks, omdetect, where the user can modify parameters affecting the source detection and therefore the overall results of the data analysis.
We also give a description how to apply barycentric correction.
- Checking omfchain output products:
- Inspection of the light curves:
One can look at the pdf files containing the light curves to check that there is some signal detected and measured (both in the source and the background). These files can be recognized by the string 'TIMESR' and the extension '.PDF' in the PPS products. If omfchain has been run, then there are equivalent files in PostScript format (extension '.PS').
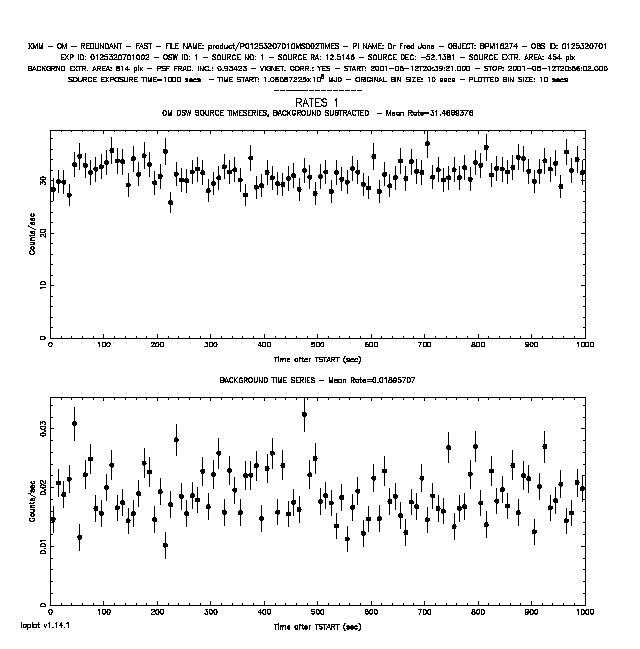
It should be noted that the Background given in the time series files, and depicted in the corresponding plots, has a different scaling if it comes from the image mode data or from the fast mode (see below) and therefore a straight comparison of both cases cannot be done.
- Checking the presence of source(s) in the fast window pseudo-image.
This can easily be done by displaying this image with SAOImage or fv. Another possibility is to overlay the detected sources onto the pseudo-image. The task implot will do it:
implot set=P0125320701OMS002SIMAGF1000.FTZ \
withsrclisttab=y \
srclisttab=P0125320701OMS002SWSRLI1000.FTZ \
device='/XW'
where P0125320701OMS002SIMAGF1000.FTZ is the OM Fast Mode Observation Science Window (OSW) Sky Image (naming convention of PPS products - note that if using products output by the omfchain task, the image files will have names of the form *SIMAGE*.FIT) and P0125320701OMS002SWSRLI1000.FTZ the corresponding OM OSW Source List.
This will overplot the detected sources on the corresponding image, and it will allow to check whether there is anything inside the fast window.
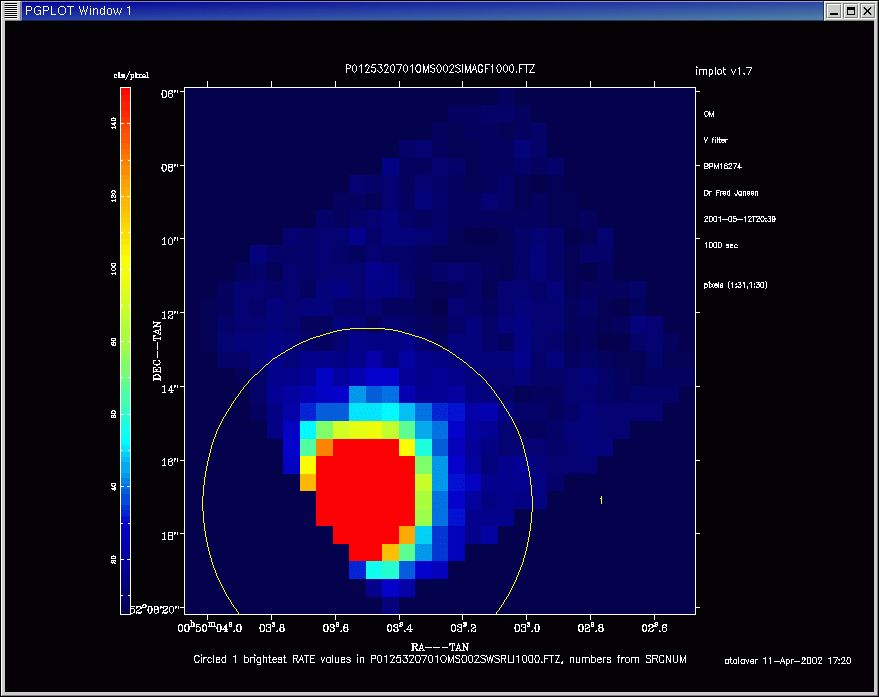
Pseudo image representing the fast mode window in sky coordinates
- Inspection of the light curves:
- Improving the source detection and background determination:
- Since the size of the fast mode window is very small (maximum size 22x23 pixels) the determination of the background is critical, particularly in case of moderately bright or multiple sources in the fast window. SAS versions higher than 10 allow the user to measure the background in the associated image data obtained at the same time as the fast mode data. Using the parameter bkgfromimage=yes will do that. This approach is the default from SAS version 14.
- If there are more than one sources in the fast window, then the detection can be affected and therefore also the light curve. In this case the background determination will be doubtful. Some parameters can be modified such as nsigma (sigma above background for detection). The size and position of the source and background extraction areas (if taken from the fast mode data) can be modified using the parameters srcradius, bkginner and bkgouter.
Invoking omdetect with regionfile=your_region.asc will allow a quick check by overlaying the currently detected sources positions on the image with SAOImage using the created region file. In the above example:
ds9 P0125320701OMS002IMAGE_1000.FIT
and then load your_region.asc.
Note that PPS products have a slightly different naming convention than the products of running the chains manually.
- Perform the barycentric correction.
As it is stated in the headers (keyword TIMEREF = LOCAL), the time values in the time series files produced by processing OM data in Fast Mode (P*TIMESR*) are referred to the XMM-Newton satellite system.
This time scale can be converted into a solar system barycenter time system by applying the barycentric correction with the SAS task barycen
The task works on the final time series produced by omfchain (files P*TIMESR*.FIT):
barycen withtable=yes table=tserie.fit:RATEwhere tserie.fit is the light curve file obtained from omfchain (task omlcbuild).
The barycen task overwrites the TIME column in the original file. Therefore it is recommended to copy it beforehand if one wants to keep the non-corrected timing.
It should be noted that for OM, barycen is applied to the time stamps of the light curve, and not to the arrival time of each individual photon. barycen will not work on OM Fast Mode events list files.
- Removed a total of (1) style text-align:center;
- Removed a total of (8) style text-align:justify;
- Removed a total of (1) style float:none;
- Removed a total of (2) border attribute.
- Converted a total of (4) center to div.