 Sign in
SAS Thread - omsource - XMM-Newton
Interactive photometry on OM data with SAS: omsource
|
Introduction The thread explains how to perform interactive photometry in OM images previously processed. Expected Outcome Users will learn how to add an undetected source to the list produced by omichain or how to improve the photometry of individual sources interactively. SAS Tasks to be Used Prerequisites Using of omsource to perform photometry interactively requires that the corresponding OM images have been already processed with omichain. Then new, non detected sources can be selected with the cursor, or the measuring parameters of detected sources can be modified to improve the results. A proper SAS set up is required. Useful Links Last Reviewed: 30 OCTOBER 2020, for SAS v19.0Last Updated: 21 October 2014 |
Procedure
If the results obtained after running omichain are not satisfactory, e.g. a source of interest has not been detected, the user can perform the photometry in a fully interactive way. Invoking omsource will allow us to select the desired source and to adjust the aperture and background region sizes so as to obtain its count rate and magnitude with all the necessary corrections.
A detailed description of this task can be found in the SAS documentation, both in HTML and Postscript format. The input for omsource is the image file *IMAGE_* that has gone through all steps of the image processing up to source detection, before conversion to north-aligned sky coordinates (see OM image processing threads). This input image can be entered in the command line as a parameter, or it can be selected from a pop-up menu.
Based on the Step by step guide for omichain it is assumed that the ODF data are located in:
${MYDATA}/
while the science products have been writen into the subdirectory:
${MYDATA}/proc/
The interactive tool is launched with the command,
omsource imageset=${MYDATA}/proc/P0561580301OMS012IMAGE_0000.FIT \
oldsrclistset=${MYDATA}/proc/P0561580301OMS012SWSRLI0000.FIT \
newsrclistset=${MYDATA}/proc/mysrclist.FIT
where behind imageset=, the name of the image can be given, oldsrclistset= allows providing an existing source list, and newsrclistset= specifies the name of a new source list that will contain the desired modified source properties. Existing sources can be modified, current sources can be added, or omdetect can be run with different parameters.
The image MUST NOT have been processed by omatt. In other words, north aligned images produced by the Pipeline or by using omatt are not valid for omsource.
The image is displayed by DS9, and an interactive menu allows us to start the source selection:
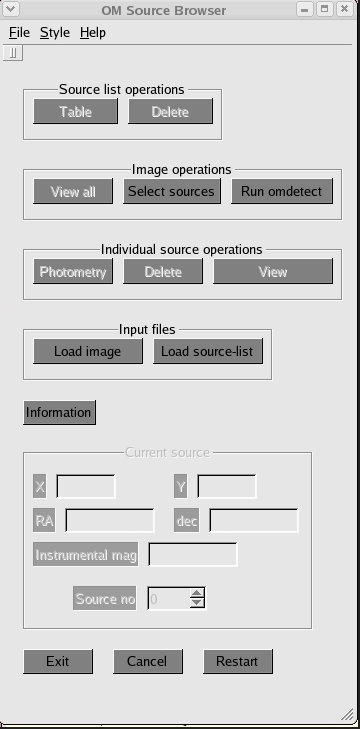

In the first menu, an existing source list can be loaded via the [Load source-list] button, which is only clickable if none was given in the command line behind oldsrclistset=.
Alternatively, omdetect can be run by clicking the corresponding button in the top. In a new pop window, the detection thresholds nsigma and minsignificance can be entered, starting from the given defaults. Pixel values >= bg + nsigma * sqrt(bg) will be regarded as being part of a possible source while sources with a resulting signal-to-noise, src counts / sqrt(src+bg counts), less than minsignificance will be discarded. Once computed, the resulting sources will be included in the ds9 window.
Additional targets that have not been found by omdetect can be selected with the cursor using the [Select sources] button. Clicking at the desired position in the ds9 window gives a blue circle whose properties will be entered into a new pop up window after a few seconds. Hitting Ok, adds the selected source(s) to the source list.
After chosing a particular source in the 'Source Selection' tab, individual photometry can be performed, modifying the aperture and background region, using the new pop window shown in the figure below. The final computation is performed by pushing the [Compute Photometry] button.
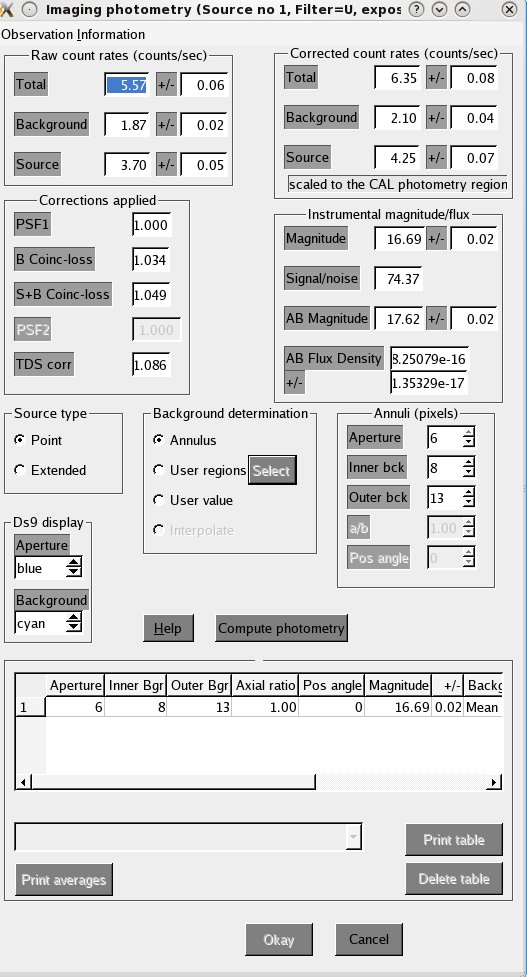
Upon Exit, the modified source list will be stored in the file provided after newsrclistset=, or a pop window appears, prompting for a file name.
|
Caveats |