 Sign in
SAS Thread - timing - XMM-Newton
Extraction and correction of an X-ray light curve for a point-like source
|
Introduction This thread contains a step-by-step recipe to extract light curves of a point-like source for all the X-ray cameras, subtracting the background and correcting for exposure losses. Expected Outcome Corrected light curves of XMM-Newton EPIC and RGS instruments. SAS Tasks to be Used Prerequisites
Useful Links Last Reviewed: 31 January 2025, for SAS v22.0Last Updated: 27 April 2018 |
Procedure
EPIC
As an example case, we will consider the extraction of a light curve from a pn event list (PN_evt.fits). The same recipe applies for MOS.
- Set up your SAS environment (see Prerequisites for this thread at the top of the page).
- If necessary, create a PN cleaned and filtered for particle background event file for your observation (see the How to filter EPIC event lists for flaring particle background Thread). Let's assume that a filtered file has been created, with name: PNclean.fits
- Be aware: if you are interested in very short time periods, such as they appear in pulsars or cataclysmic variables, you have to perform a barycentric correction. This means that the arrival time of a photon is shifted as is it would have been detected at the barycentre of the solar system (the centre of mass), instead of at the position of the satellite. In this way, the data are comparable. The SAS task barycen performs this correction. As barycen overwrites the TIME column entries, it is advisable first to copy the original event list and keep it as a backup.
cp PNclean.fits PNclean_nobarycen_cor.fits
barycen table=PNclean.fits:EVENTS
- Extract an image (in sky coordinates in this example; extraction in detector - DET[XY] - coordinates is possible as well).
evselect table=PNclean.fits imagebinning=binSize imageset=PNimage.img withimageset=yes \
xcolumn=X ycolumn=Y ximagebinsize=80 yimagebinsize=80
- Display the image.
imgdisplay withimagefile=true imagefile=PNimage.img
- Select the region from which the light curve shall be accumulated, using the Region/Circle in ds9 (see Fig.1)
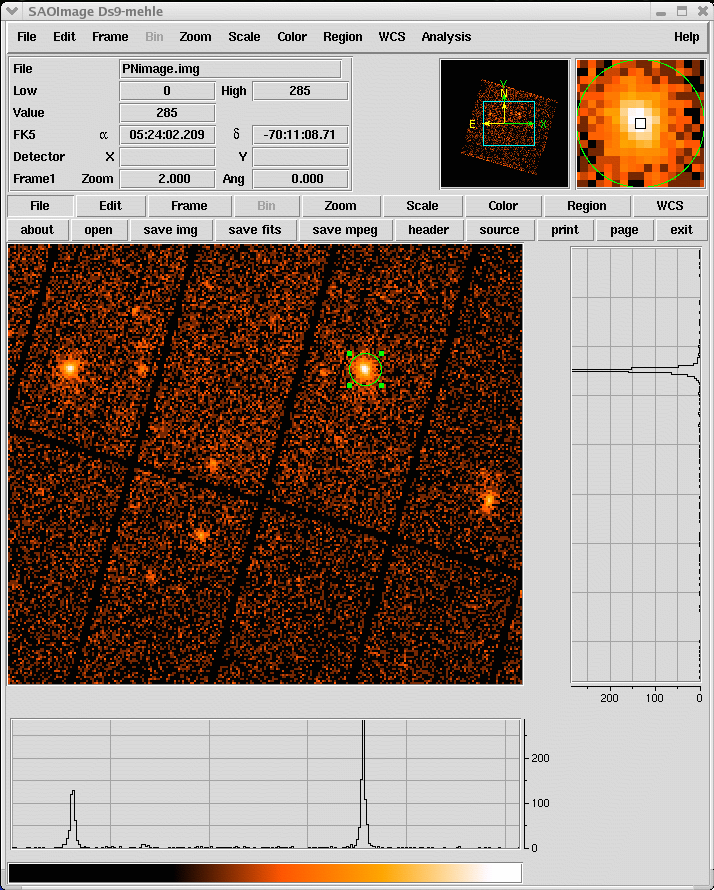
Fig.1: ds9 main window. A circular region (green circle) has been defined using the highlighted menu.
- Double-click with the cursor on the defined region. A window pops up, showing the properties of the region (Fig.2). Write down the coordinates of the Centre (30360.5, 28400.5) and the Radius(640).
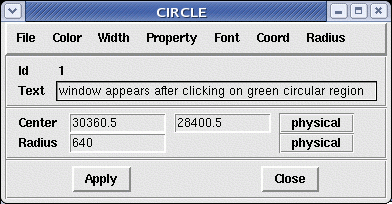
Fig.2: Selection region properties window, popped-up by double-clicking on the region in the main ds9 window
Units of sky coordinates (X,Y) are 0.05 arcsec, hence the radius in our example is 32 arcsec.
- Now you can extract a source+background light curve, using the selection region and including a quality selection appropriate for a light curve extraction: for PN, taking good events, singles and doubles with an energy range between 200 and 10000 eV (#XMMEA_EP && (PATTERN<=4) && (PI in [200:10000])); for MOS, taking good events, singles, doubles, triples and quadruples with an energy range between 200 and 10000 eV (#XMMEA_EM && (PATTERN<=12) && (PI in [200:10000])). In this example, the bin size is 100 seconds.
evselect table=PNclean.fits energycolumn=PI \
expression='#XMMEA_EP&&(PATTERN<=4)&& ((X,Y) IN circle(30360.5, 28400.5,640)) \
&&(PI in [200:10000])' \
withrateset=yes rateset="PN_source_lightcurve_raw.lc" timebinsize=100 \
maketimecolumn=yes makeratecolumn=yes
The parameter makeratecolumn=yes produces a light curve in count rates (with errors). Otherwise the light curve is produced in counts (without errors).
- Repeat steps #4 to #6 above to determine the region, from which the background light curve is to be extracted. We will assume in the following that the extraction region corresponds to an annulus, centered in (30360.5, 28400.5) and with inner and outer radii 1000 and 2000 pixels, respectively. Have a look at the "EPIC status of calibration and data analysis" document (XMM-SOC-CAL-TN-0018) for the latest recommendations on how to select source and background regions. At minimum, the background should be extracted from a source-free region at the same distance to the readout node (RAWY position) as the source region. If this is not possible, in order to ensure a similar low-energy noise contribution, you should aim to select the background from the same CCD or same quadrant of the source region.
- Extract a background light curve, using all the selection expressions defined so far, and the same bin size (100 seconds) and energy range as for the source+background light curve
evselect table=PNclean.fits \
energycolumn=PI expression='#XMMEA_EP&&(PATTERN<=4)&& \
((X,Y) IN annulus(30360.5, 28400.5,1000,2000))&& \
(PI in [200:10000])' \
withrateset=yes rateset="PN_light_curve_background_raw.lc" timebinsize=100 \
maketimecolumn=yes makeratecolumn=yes
The light curves are OGIP-complaint, and therefore can be processed by standard XRONOS-like LHEASOFT packages.
- However, light curves obtained in such a way should be corrected for various effects affecting the detection efficiency, such as vignetting, bad pixels, PSF variation and quantum efficiency, as well as for variations affecting the stability of the detection within the exposure, like dead time and GTIs. Since all these effects can affect in a different manner source and background light curves, the background subtraction has to be done accordingly. A SAS task, epiclccorr, performs all of these corrections at once. It requires as input both light curves (which are used to establish the binning of the final corrected background subtracted light curve) and the event file. This is done with a simple command line call:
epiclccorr srctslist=PN_source_lightcurve_raw.lc eventlist=PNclean.fits outset=PN_lccorr.lc \
bkgtslist=PN_light_curve_background_raw.lc withbkgset=yes applyabsolutecorrections=yes - Plot the resulting light curves, e.g.
dsplot table=PN_lccorr.lc withx=yes x=TIME withy=yes y=RATE
This command will launch the following xmgrace window
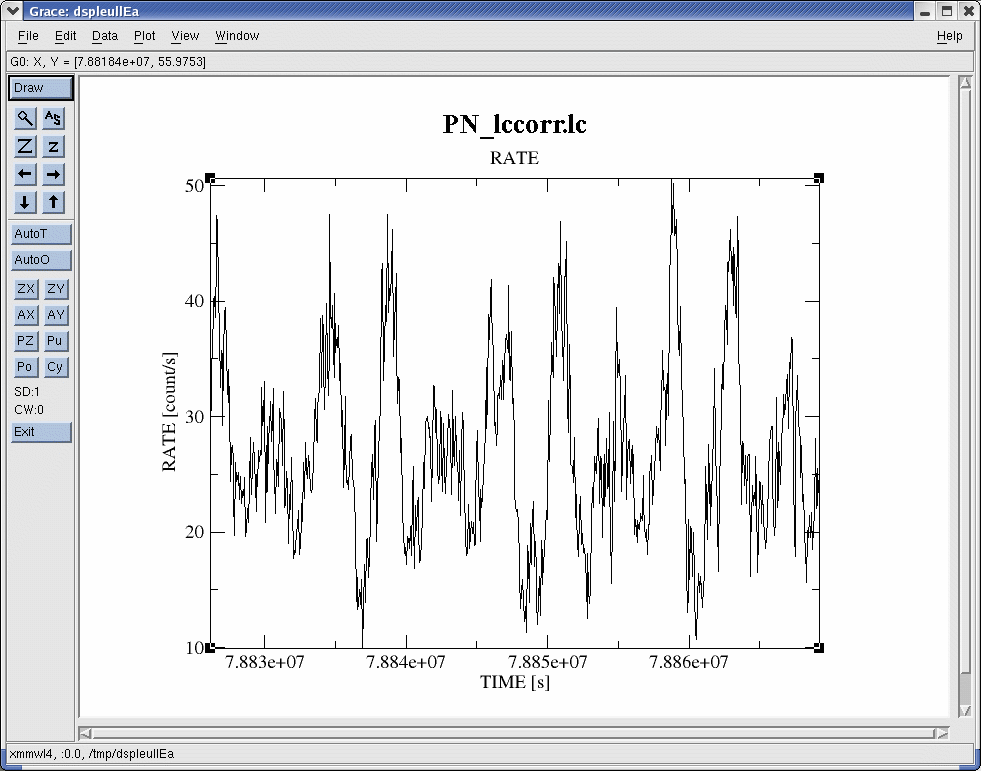
Fig.3: xmgrace window, containing the background-subtracted exposure-corrected light curve. Note: please be aware that this image is intended for illustration purposes and the light-curve does not correspond with the source of Fig.1.
RGS
We will assume in what follows that RGS products are available in the working directory: a) the RGS event list; b) the RGS source list (following the How to reduce RGS data and extract spectra of point-like sources thread). A call to the task rgslccorr will perform light curve extraction, correction and background subtraction using events from the same selection regions used for extraction of spectra for both source and background.
- Create, for example, a combined RGS1 and RGS2, 1st and 2nd order, 100-second binned exposure-corrected and background-subtracted light curve, for the 3rd source in the source list
rgslccorr evlist='P0100000101R1S004EVENLI0000.FIT P0100000101R2S005EVENLI0000.FIT' \
srclist='P0100000101R1S004SRCLI_0000.FIT P0100000101R2S005SRCLI_0000.FIT' \
timebinsize=100 orders='1 2' sourceid=3 outputsrcfilename=RGS_rates.ds
- Plot the resulting light curve, for example,
dsplot table=RGS_rates.ds withx=yes x=TIME withy=yes y=RATE
This command will launch the following xmgrace window with the combined RGS light curve.
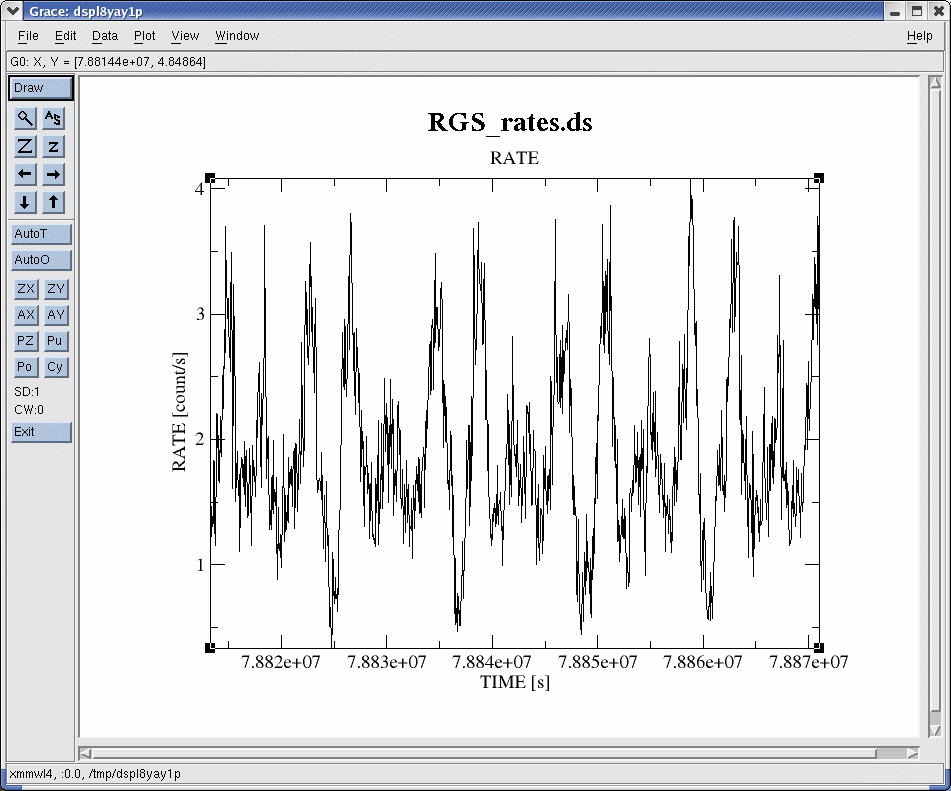
Fig.3: xmgrace window showing the background-subtracted exposure-corrected RGS light curve
|
Caveats
For detailed scientific analysis make sure that your source region is free of pile-up (see the How to evaluate the pile-up fraction Thread). |
- Removed a total of (1) style text-align:center;
- Removed a total of (11) style text-align:justify;
- Removed a total of (1) style margin:0;
- Removed a total of (2) border attribute.
- Converted a total of (6) center to div.